Tips & Tricks

Tools for Colour Tangling

The Zentangle Method is about reducing the decision making to make it easier to flow, and therefore  ‘relax’ as you are drawing.  Concentrating your focus on one elemental line, where it is going, here and now,  not worrying about the outcome or the bigger picture. 

However, one thing starts to come up, people love a little colour in their life – and in their tangling.  So once you have got confident with some tangles, have mastered some shading techniques, and are happy using tangling as a relaxing tool, the next stage is often that you want to add a little colour to them.. Maybe you want to decorate a gift tag or make a card, something with an end product in mind, and up comes the idea of adding colour…

When I am teaching about adding colour to tangles, I will often say to stick to the method, but there are certain tools which I would say are helpful to tanglers who want to add some colour easily.

For beginners, If you are not so confident with adding colour, or this is your first foray into adding it, I would recommend buying yourself a set of watercolour pencils (a set of 12 is plenty) this means you can add lots of depth of colour by applying a little colour with a ‘dry’ pencil and then using a fine brush with some water to  ‘blend’ out the colour. An easy method to play with, treating your brush as if it’s the tortillon.  If you then add the coloured pencil to a ‘wet’ surface it acts more like paint/ ink, so you can get a deeper colour. (Bonus the archival ink pens won’t bleed with the water.)

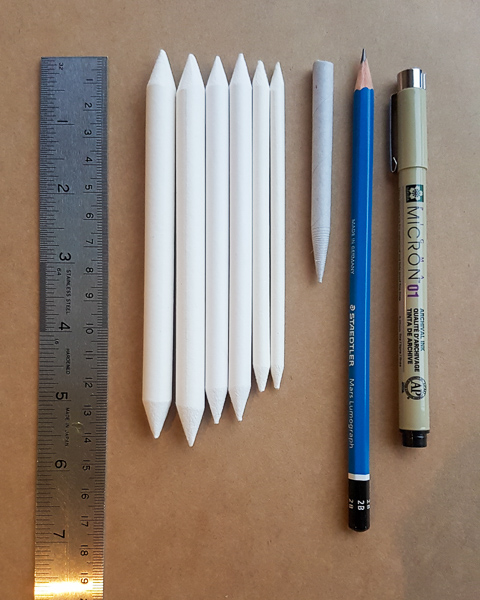
If you are blending and using colour with normal coloured pencils you will find they are near impossible to blend with a tortillon or a stump, even high waxy content ones, as neither of these paper based products is an ideal tool for the hard pigment/ wax/ binding agent or additives they contain.   So instead I recommend using a colourless blending pencil for normal coloured pencils, you can also use a white – but note if working with dark shades, it will (obviously) lighten them a wee bit..

However if using a chalk or soft pastel coloured pencil (they are powdery and are made of pure mineral pigments,) you can blend with a tortillon or a stump. The issue here is often having lots of different blending tortillons or stumps for each colour, so you spend your time constantly changing, or mixing your colours on the tool. (Why often I have a collection of purple ones). So keep these tortillons like a set of coloured pencils. Note – the finished art will need a fixative.

Using coloured gelly pens, this can be pretty effective at adding highlights, and they work brilliantly on black and coloured tiles. The Gelly pen Metallic or Moonlight ranges from Sakura are perfect for this with their vivid colours and white. Reduce your decision making by limiting your colours, you only need a few to be very effective.. Or use these gelly rolls instead of your black pen.

Paper washes, if you want to have all the colour in your prep – then use some inks or watercolours to preload the colour on your tile before you even start to tangle – you can use the different colours as if they were your string. – Yup, keep to the method as much as you can to make it easier for yourself.  There are lots of ways to do paper washes, but I think that’s for another post..

And of course, you can always be bold and treat your colouring of your tangling like a colouring book – but this time you aren’t colouring in between someone else’s lines – they are all your own! 

Tips & Tricks

Tortillon or Paper stump?

Paper Stumps and Tortillons are delicious tools and both have their own merits, and I will sit on the fence as to which I recommend as I think it depends on the situation – so read on and work out which is better for you and your project!

Tortillon – a rolled up short paper blending tool with a hollow core.  

Perfect if you are confident with your pressure, a great delicate fine tool, easy to load with graphite and move it into an exact spot, angle, curve or line when you use it flat to the paper.  It’s French for “something twisted’ – and this is exactly what it is, a short piece of paper twisted up.  

Be warned if you hold this like a traditional pencil you will end up drilling the point inside itself.  Hence why they are short in length – so hold it tucked inside the palm of your hand as you use it, and that also makes it easier to see exactly where the point is going.

You can’t sharpen these, so if you find the point is disappearing, to bring it back to life (despite using it flat, you can’t use no pressure), you can use an unwound paperclip, and insert the length of metal down the middle hollow core and gently push the point back out, and therefore extend its life.  But note, it is a ‘not very expensive small bit of paper’; it doesn’t last for lots of sustained use, mine last me a couple of months, although it does not survive the washing machine when left tucked in a pocket.

Paper stump – a robust, shortish pencil length blending tool with a solid core.

Perfect if you are not so confident with your pressure, or a beginner at shading, and a great tool for children as it’s more robust than a tortillon. It is much easier to hold traditionally like a pencil/pen.  Various sizes available to cope with fine, medium or large scale work. These too, I am afraid do not survive the washing machine cycle…

Neither can you sharpen these in a pencil sharpener, but instead use a piece of sandpaper or an emery board to re shape/clean.  I switch between using sandpaper at home and a metal nail file if I’m out and about.  Once you have a point again, off you go.  These do last longer than tortillons, as they are not as delicate a construction.  Really suited to those not used to working with light pressure and they are perfect for bigger scale.  If tangling on a tile make sure you have one of the smaller sizes.

Thin or Small size – better suited to small work and those who might otherwise use a tortillon, but who like a solid feel when shading, or are not so confident at the start.

Medium size – I usually recommend this for kids, as this is a robust item, and can work with various pressures from different abilities and ages.  They can hold it like a traditional pencil/ pen. The medium size is great for working slightly larger than a traditional tile, and ideal for shading large areas.  On a bigger piece I might switch between a medium size and then a smaller tool (both tortillon and stump) for finer areas.

Large – if your mantra is go big or go home, then this is the tool for you, it’s large so you can cope with expansive areas and larger scales – I used this when I did a piece two metres tall, so if this is the scale that you love – go for it. Needless to say totally useless on a traditional Zentangle tile!

Whichever you choose for your project – they are fabulous blending tools for graphite – no more smudging that graphite with your fingers!