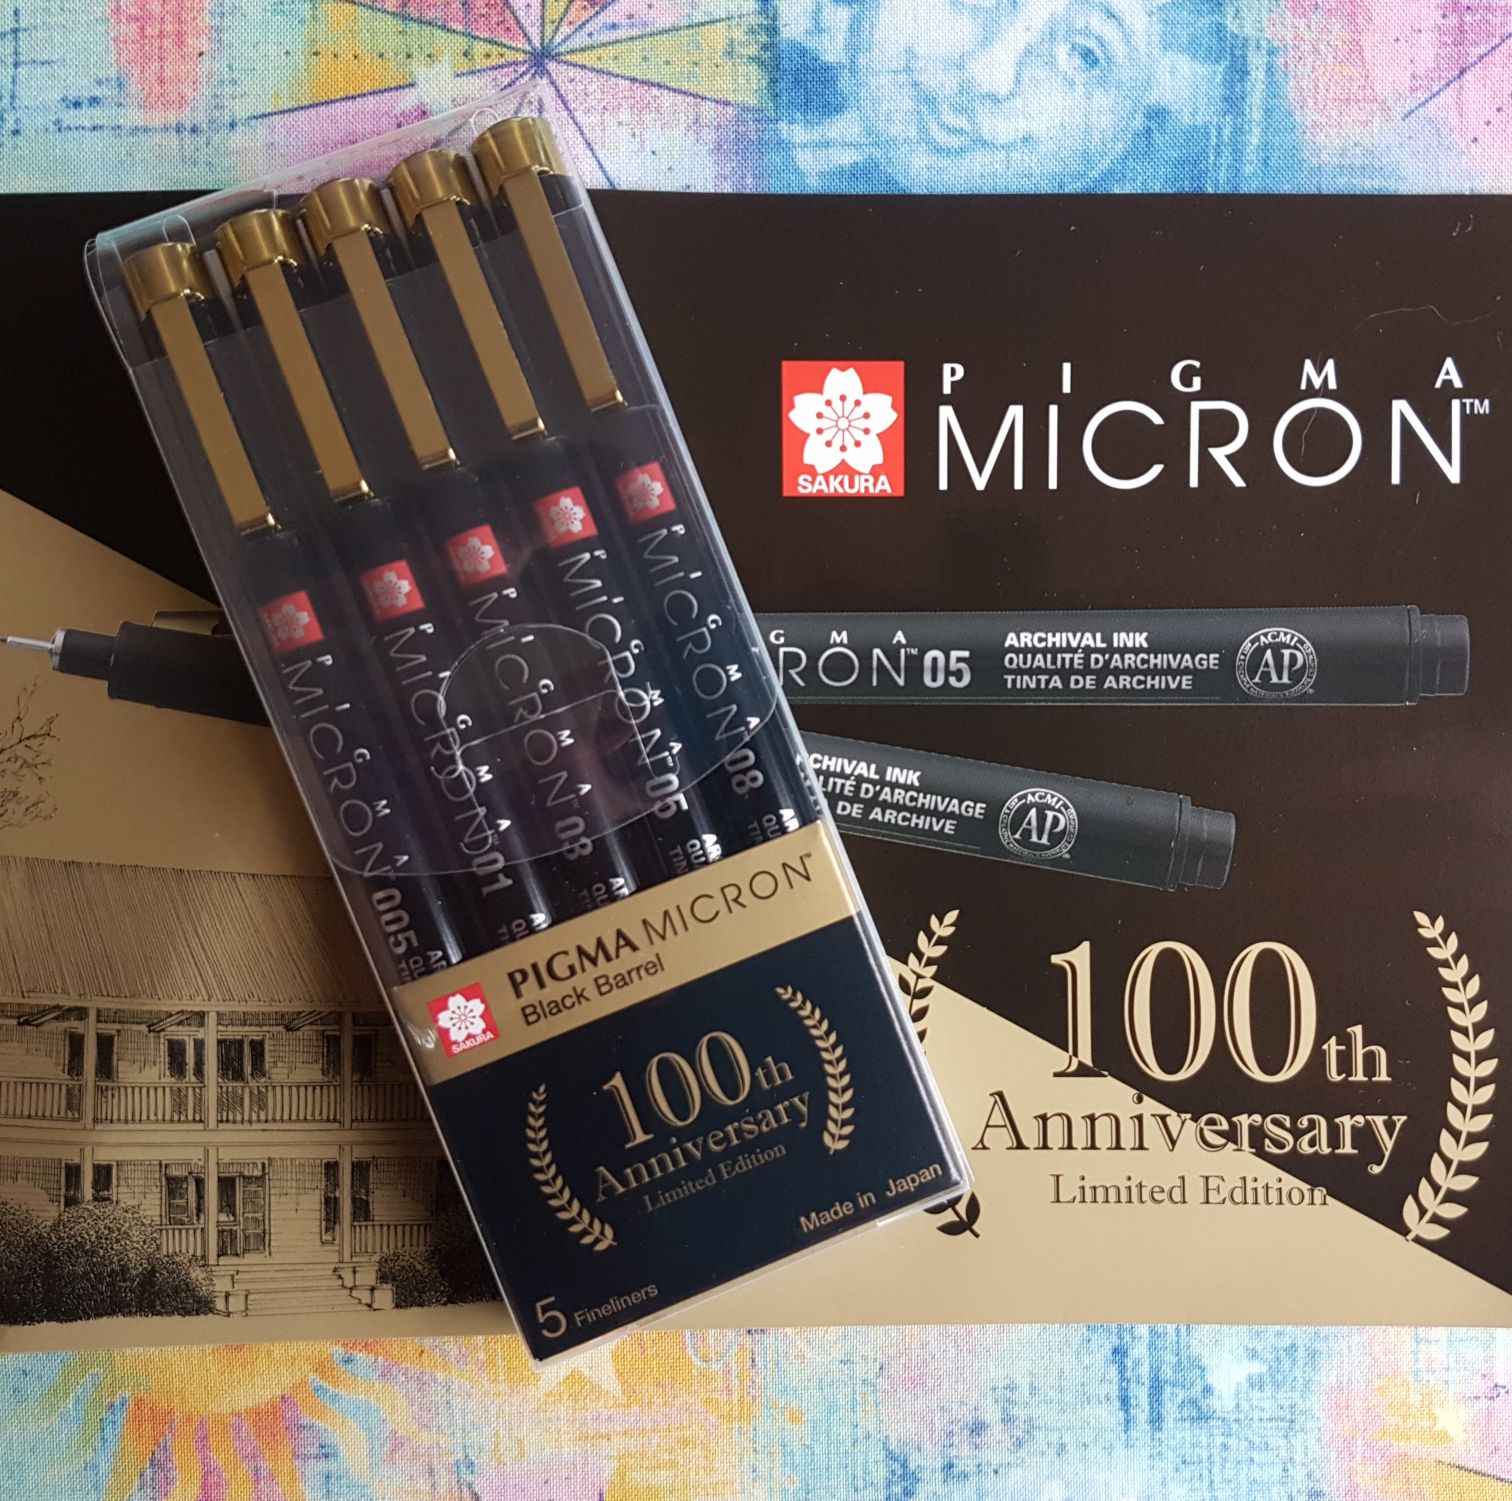
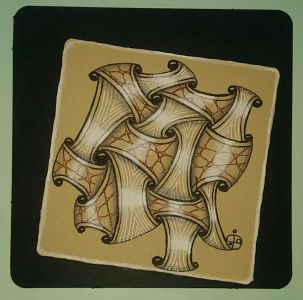
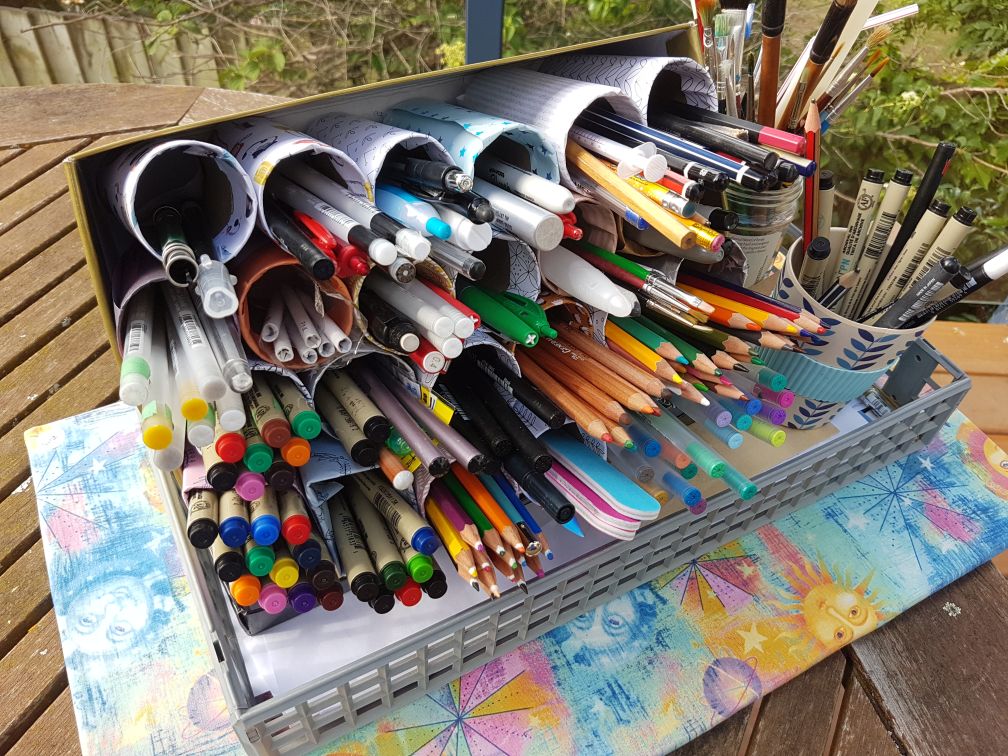
News · Tips & Tricks

Which Pen?

Microns

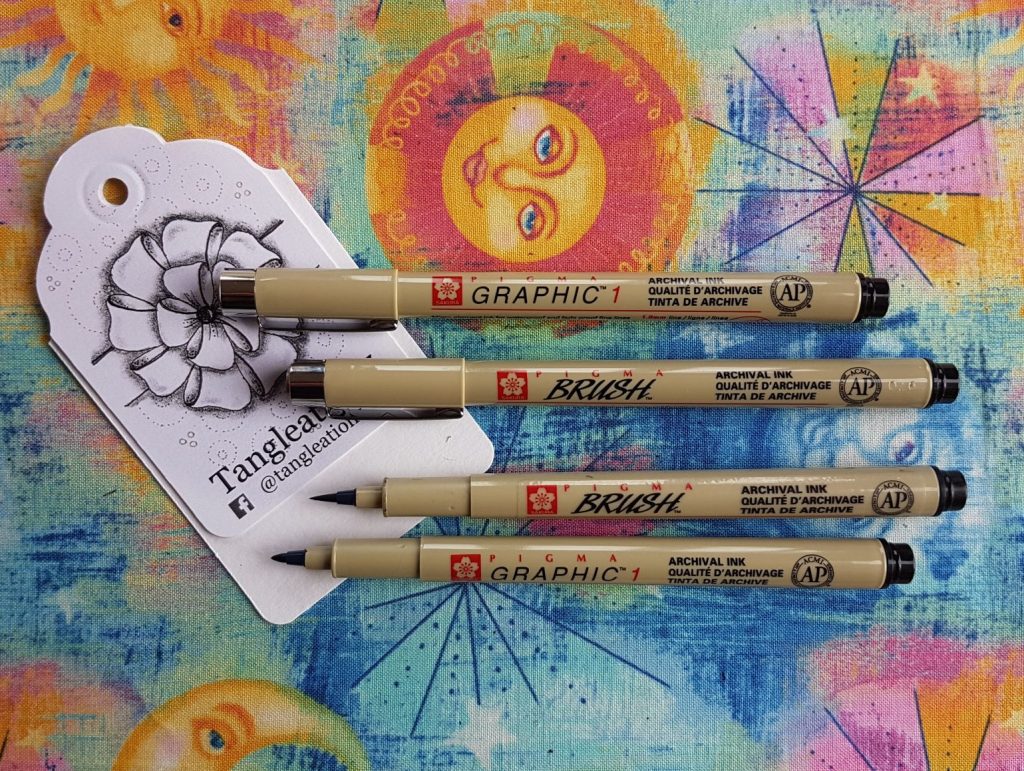
Various widths in the Sakura range from 005 (super fine) to 12 (big and bold)  I stock black from 005 to 08, and then two ‘drama’ pens a Graphic 1 (equals a 10) and a Brush pen, all with the same pigment based ink which sits on top of the paper rather than soak in.  This archival ink is perfect for long lasting, and also means that once it is dry you can add a water based watercolour, pen, ink, Lindy’s Magicals medium etc and the pen ink won’t move from whether it was put down.  

Most well known fine liners are pigment based (Sakura’s Micron Pigma, Staedtler’s Pigment Liner (with a squarer tip), Copic’s Multiliner, Derwent’s Graphik). Using a pigment based ink will give a crisp non-bleeding line on most types of paper, and once it has dried, it won’t be moved, no matter what you put on it (which makes it an excellent thing to note when doing mixed media work).  These pens are more expensive due to the pigment colourant, but they have a long life and are pretty fade resistant.

For more information on pen care check out this article

For more info on ink types check out this article

Gelly Roll Ranges

There are many variety and makes of Gelly rolls on the market, some of the cheaper ranges don’t have a lot of ink within the pen, but if you find you don’t use them much perhaps this is away to go. Various different Sakura ranges to choose from which I have described below, but also Pentel do the Hybrid Gel (gold silver and white) Uni Signo is another popular brand – Gelly rolls are more prone to drying up, so store them flat and out of extreme heat where possible. What I have described below are the different Sakura ranges of Gelly Rolls.

Moonlight Gelly rolls

Solid colour works on coloured tiles as the name suggests gel based inks which use a pigment colour but not necessarily a fine line. The Sakura Gelly rolls I stock are many the white comes in a 05, 08, 10 weights, if you aren’t good at cleaning off the nib after use be aware of the 05 – the 08 and 10 are a bit more forgiving.  Worth trying to make it a habit to clean off and roll round the ball in the nib and few times after use if you are working with a mixed media surface – after I have been doing this, I always seem to have endless pen marks over the back of my left hand!

Metallic Gelly rolls

Same as the moonlight range of solid colours, but these pens give a solid smooth metallic finish  – perfect for a shiny metallic highlighting or filling in a line. Great for larger areas too.

Stardust Gelly rolls

These gelly roll pens from Sakura give a twinkling effect.  While the Metallic range provide a more uniform pearl finish, the Stardusts’ twinkle! Brought about by tiny fragments of glass that reflect the light, these inks constantly shimmer.  

Line width is 0.5mm, with the usual smooth writing, dense ink and constant ink flow you expect from Sakura. These are stunning for birthday cards and artwork that needs a bit of dazzling!  I might add if you photograph it, the twinkling doesn’t come out, you might need some special filter to show that off!

Shadow / Luxue Gelly rolls

They flow out as a colour – Pink, Lavender, Green, Blue or Black, but as they dry, (give them 2-3 minutes to fully work,) they dry in gold or silver with a fine shadow of the original colour around the outside.  They show up best on a more absorbent paper. Smooth writing, constant ink flow to the end, waterproof, fade resistant and chemical proof. A little wider than the rest of the range – mainly because of the two colour effect.

Glaze Gelly rolls

Also known as Soufflé pens, these are the ideal pens for working on the TranzlucenZ tiles!  These Sakura pens give a 3D stained glass effect, and it’s possible to use them successfully on non-porous surfaces such as plastics, glass and coated papers.  Line width 0.6mm. For best effect work slowly and leave for 2-3 minutes to dry completely, and build the 3D effect. These pens go on semi transparent, which may be a bit different to other pens you use, so give it time to dry and build the colour. They come with a little inner cap as well, I tend to keep these on after each use, as I don’t use them for every day use.  Note there is a ‘clear’ glaze pen which can be good for putting over coloured pencil etc, so can be a useful tool for using with other mediums to get a glazed final look.

For more information on gelly roll pen care check out this article

Pencils

Traditional Graphite and white pencils

Most people adore their short cute original Zentangle – perfect for fitting into the palm of your hand to keep the point just where you want it, it is a nice quality HB. It’s pair for highlighting (ideal on anything but white tile) the Zentangle white charcoal pencil. This is a pastel pencil (both of these are General’s pencil brand and are in most people’s Zentangle kits as they are small and easy to carry anywhere. I tend to stick mine in a double ended pencil extender when they get too short to handle, and so get life out of them until the very end.  Some people (and that would be me included) as they are more confident about the shading may move to a 2B – I like the quality of the Staedtler Mars Lumograph range, but I know others who go down the 8B route – clearly they LOVE their shading.  There is no one best pencil, people style, heaviness of the pencil pressure and paper can all make a difference to how it looks, so like paint, sometimes you need to pair a pencil with the paper you have – so a wee trip to the tester station in your local art shop is not a bad afternoon experimental trip! 

If you want to write / label the back of photographs, a pencil is the best tool, not a pen so I found out.

Coloured Pencils

For beginning to work with coloured shading in your tangling, I recommend two options, coloured pastel pencils and water coloured pencils.

Pastel Pencils

If you go down the coloured pastel pencil route you will then need matching tortillons to pair with them, which is fine, but be warned they all come out purple in the end no matter how you try to keep them separate tones!  I like Kohi Nor Gioconda range, I find the Faber Castell’s Pitt pastel quite hard, the General’s Pastel Chalks and the CretaColor Studoline pastel somewhere in the middle, so find what suits your pressure and paper. (and of course what range you can get hold of local to you!

(I like using the Gioconda pastel white for highlighting on coloured tiles too.)

Watercolour Pencils

Or buy yourself a set of 12 water-coloured pencils and a water brush, which you can then add the watercolour to the area you want the deepest colour and then use a little water to gradually pull some colour across an area.  This is a fast technique and doesn’t require a fixative afterwards, but does need drying time.  Be careful not to get your pencils wet otherwise you will result in a BIG dose of watercolour paint going on the tile – which may be what you want but just a warning.  Easy to add water and blot off if you change your mind or feel it is too much, or when over a line you didn’t want to.

Once you have mastered the water colour pencil option, there is a more permanent ink solution in Derwent’s beautiful Inktense pencils – this is a pigment ink (so won’t fade, and you can add colour like the watercolour pencils, but like the name suggests, these are much stronger, so last for ages, and is often a case of collect one or two pencils at a time and build up a collection.  Often with Zentangle work, you are limiting your colour palette anyway – to reduce the decision making, so this is not a bad acquisition method.

Inktense also come in a block form too, and I use these for colouring my wall tangling borders, as otherwise it would take me years to add the coloured borders!  Water based, but when dry doesn’t move and easy to use your tangling pen over it.

Traditional Coloured pencils 

There is quite a range out there, and if you are used and already have a range of coloured pencils then by all means use them for your tangling.  I’ll admit I don’t use them a lot, but if I am going down a waxy pencil I use my Prismacolor set and if I am going down a less waxy coloured pencil, I use a Derwent Blender which I find is great to use on a traditional coloured pencil when used in a tangling context. Alternatively if you are struggling to blend, you can dip your pencil in a wee pottle of Vaseline (my chemist does a tiny handbag size pottle) and that is great medium to mix the colour – if a little less easy than the purpose built blender pencil! 

Other Types of Pen

For working on Ceramic surface – I love the Edding Porcelain brush pens – 1-4mm width, if you are fine with a brush pen these are excellent.

For working on glass, ceramic, wood and metal – Sakura Identi pen, I stock these in black but they do come in limited range of other colours.

Wall Tangling – big scale tangling – the Edding 300 series – 1.5- 3mm tip, brilliant permanent marker, which doesn’t bleed on papers and is great for big scale tangling! I love these for the big work. works well on most surfaces (think tagging buildings) Although when I want to do a large amount of drama fill on something you’ll find there is always one lurking in my pencil tin! I have also had a lot of fun with a Posca pen for some permanent outdoor tangling over paint!

Talking of bigger scale and multi surfaces the Sakura Pen Touch in gold and silver are great tools, you need to shake them to mix the ink, – they are not a fine line tool at all, but great for large areas and they have an opaque ink that works on most surfaces- wood, plastic. glass, metal, leather, porcelain and rubber.

Colouring in – options here include Tombow Dual Brush Pens – for coloured pen work most people use these in the tangling world, very wide range and blendable, you can usually pick them up solo and add to your collection, and permanent ink. Again I sometimes use them on Wall Tangling canvases, with the Brush tip end, so highly versatile with the double ends and great for big colouring in. For finer work people may have a brush pen set or Staedler’s fine liner sets, which are affordable and a wide range of colours. Koi Brush pens are another lovely option suitable to diluting with a water brush for a blending technique.

If you think I have missed a surface to draw on and the pen that you find is great, let me know!

News · Tips & Tricks

Copyright and Original

Recently both in an online forum and an email direct to me, I was asked about the copyright of patterns.  So I thought just penning my thoughts here might be an idea. 

A tangle is a pattern that has been deconstructed (by someone) and it is let out in the world for others to use as they wish. It is always nice if you can attribute a tangle to who deconstructed it if you promote it on social media – it’s just a kind thing to do, either with the name of the person, or the tangle name.  Patterns have been out on this planet long before us humans got here, nature shows us some beautiful examples, through leaves, flowers, snowflakes, lichen, shadows, water reflections.  Patterns are everywhere.

Where a pattern is turned into a logo, or a piece of art designed it can be copyrighted. If drawn by you and is totally your own work, you hold claim over the image.

If you do an original piece of art, it’s yours. You can do with it as you wish. (You can give credit if applicable to the tangles if you post on social media, but the drawing itself is yours. Compare it to drawing sunflowers, although when we think of a drawing of sunflowers, most people will instantly come up with one artist associated with ‘sunflowers’ but it doesn’t stop anyone else drawing them. So if you draw a ‘tangle’ design of your own composition, do with it as you like.

Where you can run into naughty territory is if you take someone else’s composition, and draw it in the same way, although ‘your drawing’ is yours, the ‘design’ of the drawing is someone else’s therefore you would need to credit it as such.  For example if you saw a piece you liked and copied it, or if you did a lesson by someone, credit them, they are the ones that came up with the design idea.

If you are are then going to profit from this artwork, you’ll need to get permission, because you can’t honestly say it is ‘all your own’ from beginning to end, and although you can promote your drawing it should be with a credit to who helped you get there.

Say for example you have been asked to design a tattoo by a friend. If it’s your design and work – all good, you don’t need to credit it on someone’s arm, both they and you know that it had been a design commissioned between you both, and the tattoo artist will respect that, and also lay claim to the work they did on your friend’s arm.

But as another example if you followed a lesson online and you then choose to get it printed and sell the cards for money, you would need to ask permission from the person who did the composition, it may be your pen work, but they gave you the design.  If you say did a secondary design, perhaps taking the techniques that you learnt from your lesson and put them into your own design, you are all good.  If you feel like being kind and put a photo up on social media, it’s always nice to tag someone to show you appreciate what they inspired you to do.  

Likewise if you teach a technique you can attribute to someone, good idea to mention their name. Some techniques have been around the art world for years, but some person has come along put a tangle spin on them. And if course more than one individual can come up with an idea at a similar time, and each will have their own spin on the technique. Often if you reach out to a fellow tangler they are delighted it is getting used. 

Tips & Tricks

Extend your Shading and Enhancements!

And finally it has arrived – my Extend your Enhancements! The sister guide to my handy shading guide, both now available to buy on my website, and they can be shipped all over the world*.

SO excited to bring this guide out, covering the traditional ones (Aura, Perfs, Sparkle, Rounding and Dew Drops) as well as ones influenced by other Tanglers creative ideas and new ‘what ifs’ I have come up with over the last 7 years. A collection of over 150 illustrations, suggestions, prompts and ideas to enhance your tangles, it’s a great pocket reference guide of ways to enhance your tangles. The original Shading guide has over 180 illustrations, suggestions, and motivations for shading – so the pair are jam packed with a very large amount of ideas!

* Note I can ship the Extendable guides anywhere are they travel as a letter. But also I now ship other products to Australia – and of course any downloadable lessons are available worldwide.

And to launch this guide, I have recorded a video lesson on just one of these enhancements the humble but very useful ‘Perfs’ – so if you are keen on following along creating your own beautiful reference tile of various perf enhancements, you can buy the “Performing Perfs” video lesson with its handout from my website.

Tips & Tricks

Month of Mindfulness

click on the image to take you to the intro video

In August 2022 I recorded a series of videos to celebrate ‘mindfulness month’ triggered by a project from The Kindness Institute and the Mental Health Foundation of New Zealand. There are now a series of 31 free videos on Youtube to give you quiet moments of thought, acceptance and tangling penmanship. I have shared some tangles that I find the most mindful to draw, or done in a mindful way.

They are small 10-ish minute videos, so you just need to grab something to draw on, along with your favourite tangling pen, pencil and blending tool to join in. You can start when suits you, but I hope the short snippets are easy to put into your everyday for a 31 day period, and make it easy to help you build up a habit. A (small) commitment to yourself and your mental health, each day.

Above is my final collection of Hexagon tiles, although I still have my MonthDone Journal containing all the other samples I showed in the videos. Clicking on the photo will take you to the introduction video. It is never too late, or a wrong time to start.

Happy Mindful Tangling!

Tips & Tricks

Pen Care

This information came from the Sakura of America website, but the information is great, so I have replicated it here, hopefully the more you know the more it helps look after your pens. (Note though – I have had success with putting Gelly rolls in hot water for a short while to get them going again – so it maybe depends on the cause of the fault. I have had success with unclogging a micron with use of dipping it in rubbing alcohol – you can buy a wee bottle at your local chemist.)

Gelly Roll Pen Care
Gel inks need to be kept sealed away from air so it is very important to put the correct cap on the pen between uses because unlike regular ballpoint pen ink, prolonged exposure to air will cause the gel ink to dry-out in the tip/ball chamber. (removing the barrel end plug will have the same effect)

In our Gelly Roll ink system there is a tiny silicone ball inside the cap that touches the tip and helps prevents any air from drying out the gel in the ball chamber when the cap is on. If this silicone ball is damaged or removed, the pen will eventually dry out and not work.

Gelly Roll can be stored horizontally or vertically because of the properties of gel ink. If you choose to store them vertically, just be sure that you don’t drop them into the pen cup as this can cause air bubbles to form in the gel, which will disrupt the ink flow.

The best way to see if a Gelly Roll pen can be revived is to scribble in circles and/or firmly tap the tip of the pen on a pad of paper. The motion makes the tip (ball) roll and causes the gel ink to be pulled into the ball tip chamber. It might take a few tries, but may help to revive the pen. There is no guarantee though that this will start the pen again. Heating a Gelly Roll tip or shaking the pen will not correct the problem of a clogged nib. This technique only works for oil-based ballpoint pens.

Micron Pen Care
Micron’s best use is on paper, so be aware that alternative surfaces may contribute to a bent or clogged nib.

Why is my Micron nib getting clogged?
A Micron nib may clog from use with partially dried paint or primer, wood dust, fabric dust, starches and protections on fabric surfaces and very fibrous paper. Micron nibs are small plastic tubes which allow our pigment ink formula to easily flow from the barrel to the paper. When any foreign matter clogs these tubes, the Pigma ink flow is blocked.

Why is my Micron nib so delicate?
Microns are designed to be used at a 90° degree angle. The smaller point sizes (003, 005 and 01) use very delicate nibs to create the extra fine line, so they need to be used with a very light touch, no more than the weight of the pen itself. Microns require very little pressure to provide a flow of ink. If you experience a bent nib, switching to a thicker nib size, and/or using lighter hand pressure when writing, should resolve the issue. Our Gelly Roll or Pigma Micron PN pens provide an alternative for a more durable point and are ideally suited for everyday writing use.

Why is my Micron leaking?
A leak near the nib holder or ink wick could be caused by dropping, inadvertently shaking, or accidently applying centrifugal force to the pen by spinning it in your hand. Be sure to handle your Microns with care to prevent leaks from happening.

Why did my Micron pen run out?
Although Sakura strives to make a durable Pigma product, it is considered a “disposable pen”. Our standard product performance is based on a 24 month shelf life. Most of our Pigma products can last longer than the 24 months (with the exception of running out of ink or damage to the nib) under ideal use conditions.

image of my Christmas pens and tags kit
Tips & Tricks

The Aura of an aura

“The distinctive atmosphere or quality that seems to surround and be generated by a person, thing or place”.

One of the main enhancement techniques is adding an ‘Aura’ and what a powerful technique it is. It gives a bridge, a gap, a space, a pause between a line or section or tangle.
Here’s some techniques/ prompts to try:
– drawn slowly so it’s tidy and exact,
– has big flare with a wide or wobbly line
– added sparkle as you minimise the ink and instead of a continuous line make some dashes or dots.
– boldly exaggerate it, add some weighting or rounding to the line.

Using an aura enhancement gives a deliberate decoration around a section, tangle or tile. It gives your tangling a special atmosphere. There are many tangles which are built with the aura, Diva Dance, Hurry, AuraKnot and Arukas, to name a few – they all thrive on using aura to make up the tangle, and add a repetitive ‘space’ to the tangle.

So when you’re next tangling – appreciate the aura and use it once in a while on a tile.
Tips & Tricks

Grid based tangles – ways to play

Dragonfly wing – what a beautiful piece of inspiration for a ‘grid’

“When one tugs at a single thing in nature, you find it attached to the rest of the world.”

John Muir

One of nature’s grid which influenced a thought or two about grid based tangles. You can have a grid which looks like it’s straight out of a maths exercise book (and has been drawn exact, parallel and even) or alternatively you go a little ‘crazy’ with curved and loopy lines all over the place to mix up your matrix.

With Zentangle it doesn’t matter which you do – there are no mistakes, just whatever works for you to gain pen flow. These beautiful dragonfly wings, clearly weren’t using a ruler or any type of maths, but they enable the insect to fly, If for only for a rather unfair short lifecycle.
When starting a tile using a grid based tangle is a nice warm up, where using a grid is a simple tool, (a extra simple string if you like), to ease into a tile. So next time you want a little grid play if you are feeling organised, then do a regular even grid. Or once you’ve warmed up, perhaps try just something a little different with the grid lines. Maybe they are organic – with irregular shapes and directions, curves and sways of the line. Or use perspective – with the lines growing outwards from narrow to wide or in concentric circles. Perhaps they are cracked – have some irregular straight lines in a multitude of directions. Or optical – using a circular 3-D shape to wrap the grid lines through the space so they give the illusion of a 3-D object on the paper.

When you apply the philosophy of no mistakes with Zentangle, you can make your own ‘grid’ to tangle. Here’s a play with Florz and some wayward “grid” lines, inspired by the dragonfly, gone from living nature but still attached.
Tips & Tricks

Switching the Elements

Thinking about the wonderful simple strokes that make up Zentangle lines – a dot . a curve C, a double curve S, and a line I.
Spend a bit of time thinking about the fun you could have switching them up. A simple way to create some tangleations (variations of the tangle) is by switching the elemental stroke you use.
It’s a great way to play with tangling, as you don’t need to learn a new tangle, you can choose some you already know well and have fun playing switch with your elemental strokes. So where there is a straight line – draw it curved, and then try vice versa. Instead of a single curve can it work with a double curved line?

It doesn’t take too much thinking once you get into it. You can still be mindful with your pen, no decision making (other than not doing the elemental stroke you usually do) , as you know what your next step of the tangle is going to be, as you already know that tangle; it is easy to let the structure flow. So the switch from curve to straight or the straight to the curve and relish the ‘opposite’ creative results.

So here are my opposite element tangleations on Flux, Arukas, Henna Drum and Jonqual. A fun pair of tiles.
Tips & Tricks

A simple play with the Method

As New Zealand moved into lockdown having been free for 6 months, I thought I’d head back to making things simple. So a nudge to not making life complicated, something to do when you headspace isn’t quite focused. One tile, one tangle, often known as a Mono-tangle. It’s an ideal vehicle for going back to the mindful roots and focussing on the here and now of Zentangle, as you reduce the decision making, putting down one stroke at a time, especially easy with a tangle you know really well. This produces a flow from your pen and encourages your creativity. If you feel under pressure you might just build the tangle on the tile, slowly branching on each element, stroke by stroke, great ones to try are Tripoli, Munchin or Huggins. or you could go a little ‘Crazy’ Huggins……
Or perhaps you want to play, like this wee tile with Printemps. A gorgeous spiral tangle, beautiful for filling in many odd shaped sections of your string. So take each section and draw it with a different attribute, so by the time you have finished you’ll have many tangleations.

Here are some prompts to think about if having an easy play with the tangle Printemps:

– weighted lines
– big and small together
– overlap
– grid like
– round
– ovals
– egg shapes
– with sparkle
– with drama
– with background,
– different rotations,
– heavy dot in the middle – and we haven’t even got to shading options.

Take a moment and a little space for yourself and pick up a tile your favourite tangling pen and enjoy tangling with your favourite tangle!

Tips & Tricks

Pens & Inks

Thought it would be a little bit of fun to explain what exactly a ‘pigment’ ink is, and why it’s the best ink for tangling.

A little background – there are two types of colourant in ink  – dye and pigment, and either of these two can be used in a carrier/binder, be that oil, solvent, water or a gel.  Please note it’s not quite a simple recipe of two items, various things can be added like gelatin, lubricants, surfactants, solubilizers, resin, gum, shellac, soot – the list goes on!

Colourants

A ‘dye’ colourant has smaller colourant particles, is water soluble, and can make vivid bright colours. It’s cheaper than pigment inks, but doesn’t have the same fade resistance as a pigment.

A ‘pigment’ colourant has a larger particle size, they are waterproof, although may use water as its binder, but once dry won’t move. Although not as bright colours can be achieved, on most papers they will produce a sharper line, as the pigment tends to stay on the surface not bleed.

Small Note – Paper also matters, as a basic rule high ‘cotton’ based not ‘wood pulp’ based paper also helps stop bleed.

Binders

Oil-based – generally used in ballpoint pens, thick and sludgy, great for working on rough surfaces or glossy paper, but does take a wee while to dry on some surfaces – so don’t smear it, but it’s a cheap versatile ink, but often with limited colours.

Solvent-based – used in permanent markers (you know the type – they smell) – e.g. alcohol based pens, made with dye ink as they hold a more vibrant colour range. 

Water-based – probably the most common – used in fountain pens (dye), for drawing pens (dye), Pigma Microns (pigment), India ink (pigment), calligraphy (pigment), rollerball pens (can be either pigment or dye, so check the label).

Gel-based – used with a large roller ball pen system but will normally use a pigment colourant, so will give a strong colour and smooth line. Excellent for working on porous surfaces (pigment will sit on top rather than bleed into the surface).

So what does all this mean from a tangling perspective?

Most well known fine liners are pigment based (Sakura’s Micron Pigma, Staedtler’s Pigment Liner, Copic’s Multiliner, Derwent’s Graphik). Using a pigment based ink will give a crisp non-bleeding line on most types of paper, and once it has dried, it won’t be moved, no matter what you put on it (which makes it an excellent thing to note when doing mixed media work).  These pens are more expensive due to the pigment colourant, but they have a long life and are pretty fade resistant.

Where a fine felt pen might not be the best tool of choice is with a surface that lifts off, or other pen ink isn’t quite dry yet. For example a glitter based paint, as the small glitter particles can clog up the felt nib – so either use a black gelly roll (thicker ink, different binder) or a plastic nibbed pen. (You may still require a pigment ink not a dye ink, if being waterfast is required.)

If you want to work on more than just paper, a gel based ink is not a bad choice, its thicker properties mean it adheres to the surface (although will take longer to dry) and so is pretty versatile for various ‘odd’ surfaces. Note that you should keep all your gel pens stored flat, and the lids tightly on when you finish with them – they won’t work if they get a chance to dry out or clog – although if you find a pen which has dried out and there is still plenty of ink, try wiping it with rubbing alcohol (you can buy it from a chemist), and heating it slightly with a hair dryer or immerse in hot water for a few minutes and you may get it moving again. the gel binder can make it clog up faster, so extra care needed on putting on the lids/ caps.

If you are adding graphite / shading and go over your black ink, you can always take your Micron over the graphite to make it black again. (But note the paragraph above – don’t clog up your fine nib).  If you are wanting to colour after tangling, make sure it’s pigment based ink pen for your tangling – an easy route to colour instead of shading is to use some watercolour pencils and then a water brush, as any pigment based ink won’t run. You can also use chalk pencils, but be careful any fixative applied doesn’t then dull the lighter shades of chalk.

Many gel pens have extra ingredients (think Metallic or Stardust ranges), so as the pen manufacturers come up with new and exciting things to add – who knows what effects we’ll be able to pull from our pens in the future! 

Whichever pen you choose to use – have fun!