“The distinctive atmosphere or quality that seems to surround and be generated by a person, thing or place”.
One of the main enhancement techniques is adding an ‘Aura’ and what a powerful technique it is. It gives a bridge, a gap, a space, a pause between a line or section or tangle.
Here’s some techniques/ prompts to try: – drawn slowly so it’s tidy and exact, – has big flare with a wide or wobbly line – added sparkle as you minimise the ink and instead of a continuous line make some dashes or dots. – boldly exaggerate it, add some weighting or rounding to the line.
Using an aura enhancement gives a deliberate decoration around a section, tangle or tile. It gives your tangling a special atmosphere. There are many tangles which are built with the aura, Diva Dance, Hurry, AuraKnot and Arukas, to name a few – they all thrive on using aura to make up the tangle, and add a repetitive ‘space’ to the tangle.
So when you’re next tangling – appreciate the aura and use it once in a while on a tile.
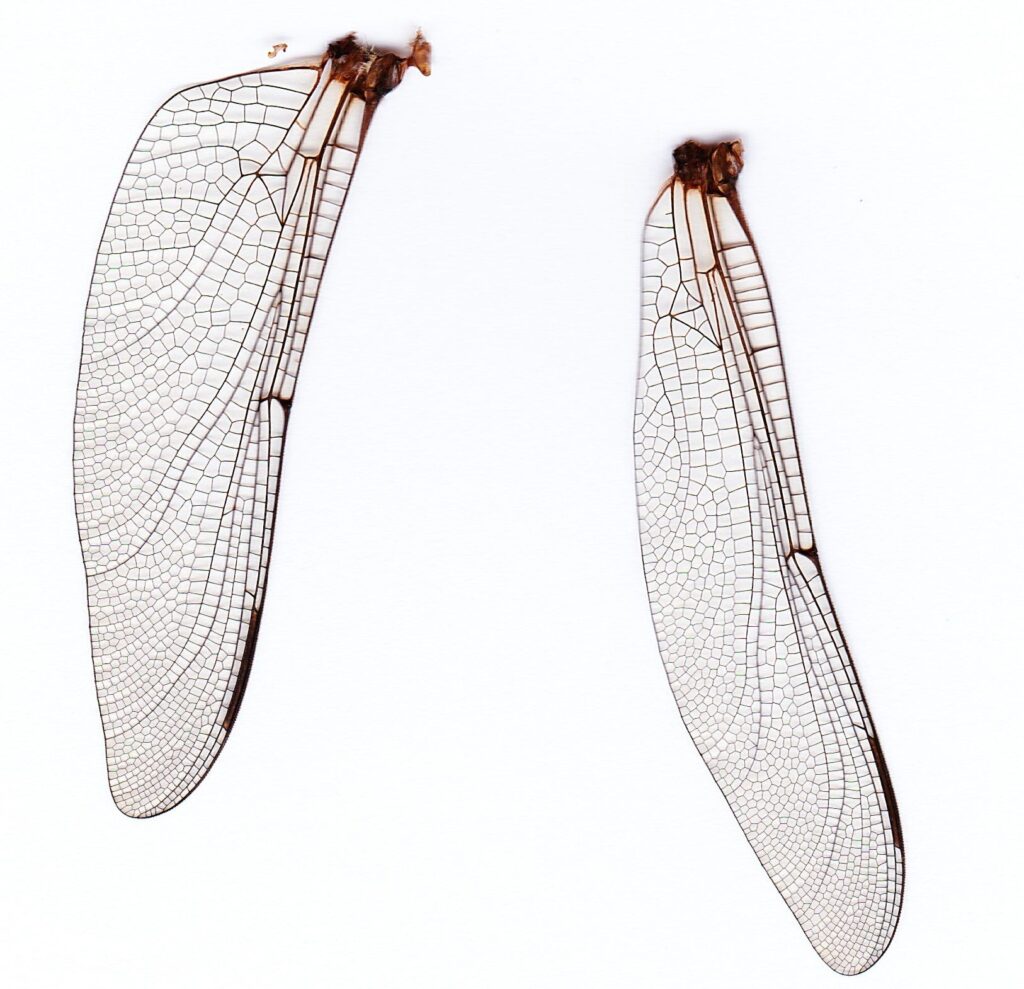
Dragonfly wing – what a beautiful piece of inspiration for a ‘grid’
“When one tugs at a single thing in nature, you find it attached to the rest of the world.”
John Muir
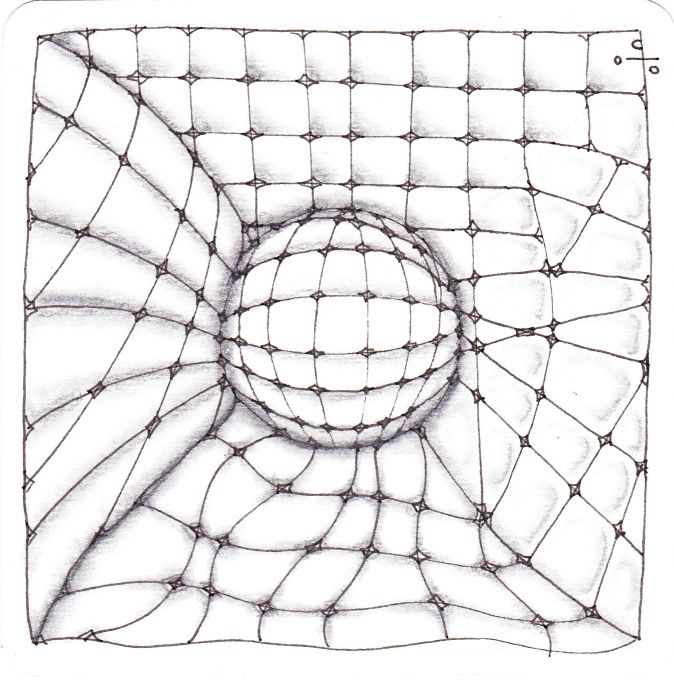
One of nature’s grid which influenced a thought or two about grid based tangles. You can have a grid which looks like it’s straight out of a maths exercise book (and has been drawn exact, parallel and even) or alternatively you go a little ‘crazy’ with curved and loopy lines all over the place to mix up your matrix.
With Zentangle it doesn’t matter which you do – there are no mistakes, just whatever works for you to gain pen flow. These beautiful dragonfly wings, clearly weren’t using a ruler or any type of maths, but they enable the insect to fly, If for only for a rather unfair short lifecycle.
When starting a tile using a grid based tangle is a nice warm up, where using a grid is a simple tool, (a extra simple string if you like), to ease into a tile. So next time you want a little grid play if you are feeling organised, then do a regular even grid. Or once you’ve warmed up, perhaps try just something a little different with the grid lines. Maybe they are organic – with irregular shapes and directions, curves and sways of the line. Or use perspective – with the lines growing outwards from narrow to wide or in concentric circles. Perhaps they are cracked – have some irregular straight lines in a multitude of directions. Or optical – using a circular 3-D shape to wrap the grid lines through the space so they give the illusion of a 3-D object on the paper.
When you apply the philosophy of no mistakes with Zentangle, you can make your own ‘grid’ to tangle. Here’s a play with Florz and some wayward “grid” lines, inspired by the dragonfly, gone from living nature but still attached.
Thinking about the wonderful simple strokes that make up Zentangle lines – a dot . a curve C, a double curve S, and a line I.
Spend a bit of time thinking about the fun you could have switching them up. A simple way to create some tangleations (variations of the tangle) is by switching the elemental stroke you use. It’s a great way to play with tangling, as you don’t need to learn a new tangle, you can choose some you already know well and have fun playing switch with your elemental strokes. So where there is a straight line – draw it curved, and then try vice versa. Instead of a single curve can it work with a double curved line?
It doesn’t take too much thinking once you get into it. You can still be mindful with your pen, no decision making (other than not doing the elemental stroke you usually do) , as you know what your next step of the tangle is going to be, as you already know that tangle; it is easy to let the structure flow. So the switch from curve to straight or the straight to the curve and relish the ‘opposite’ creative results.
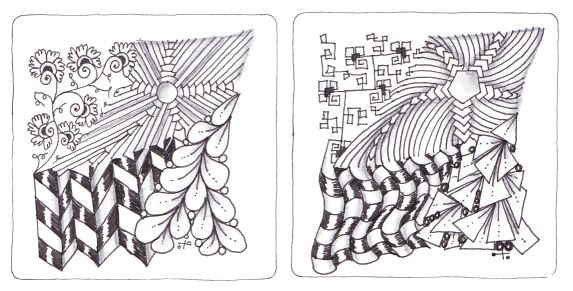
So here are my opposite element tangleations on Flux, Arukas, Henna Drum and Jonqual. A fun pair of tiles.
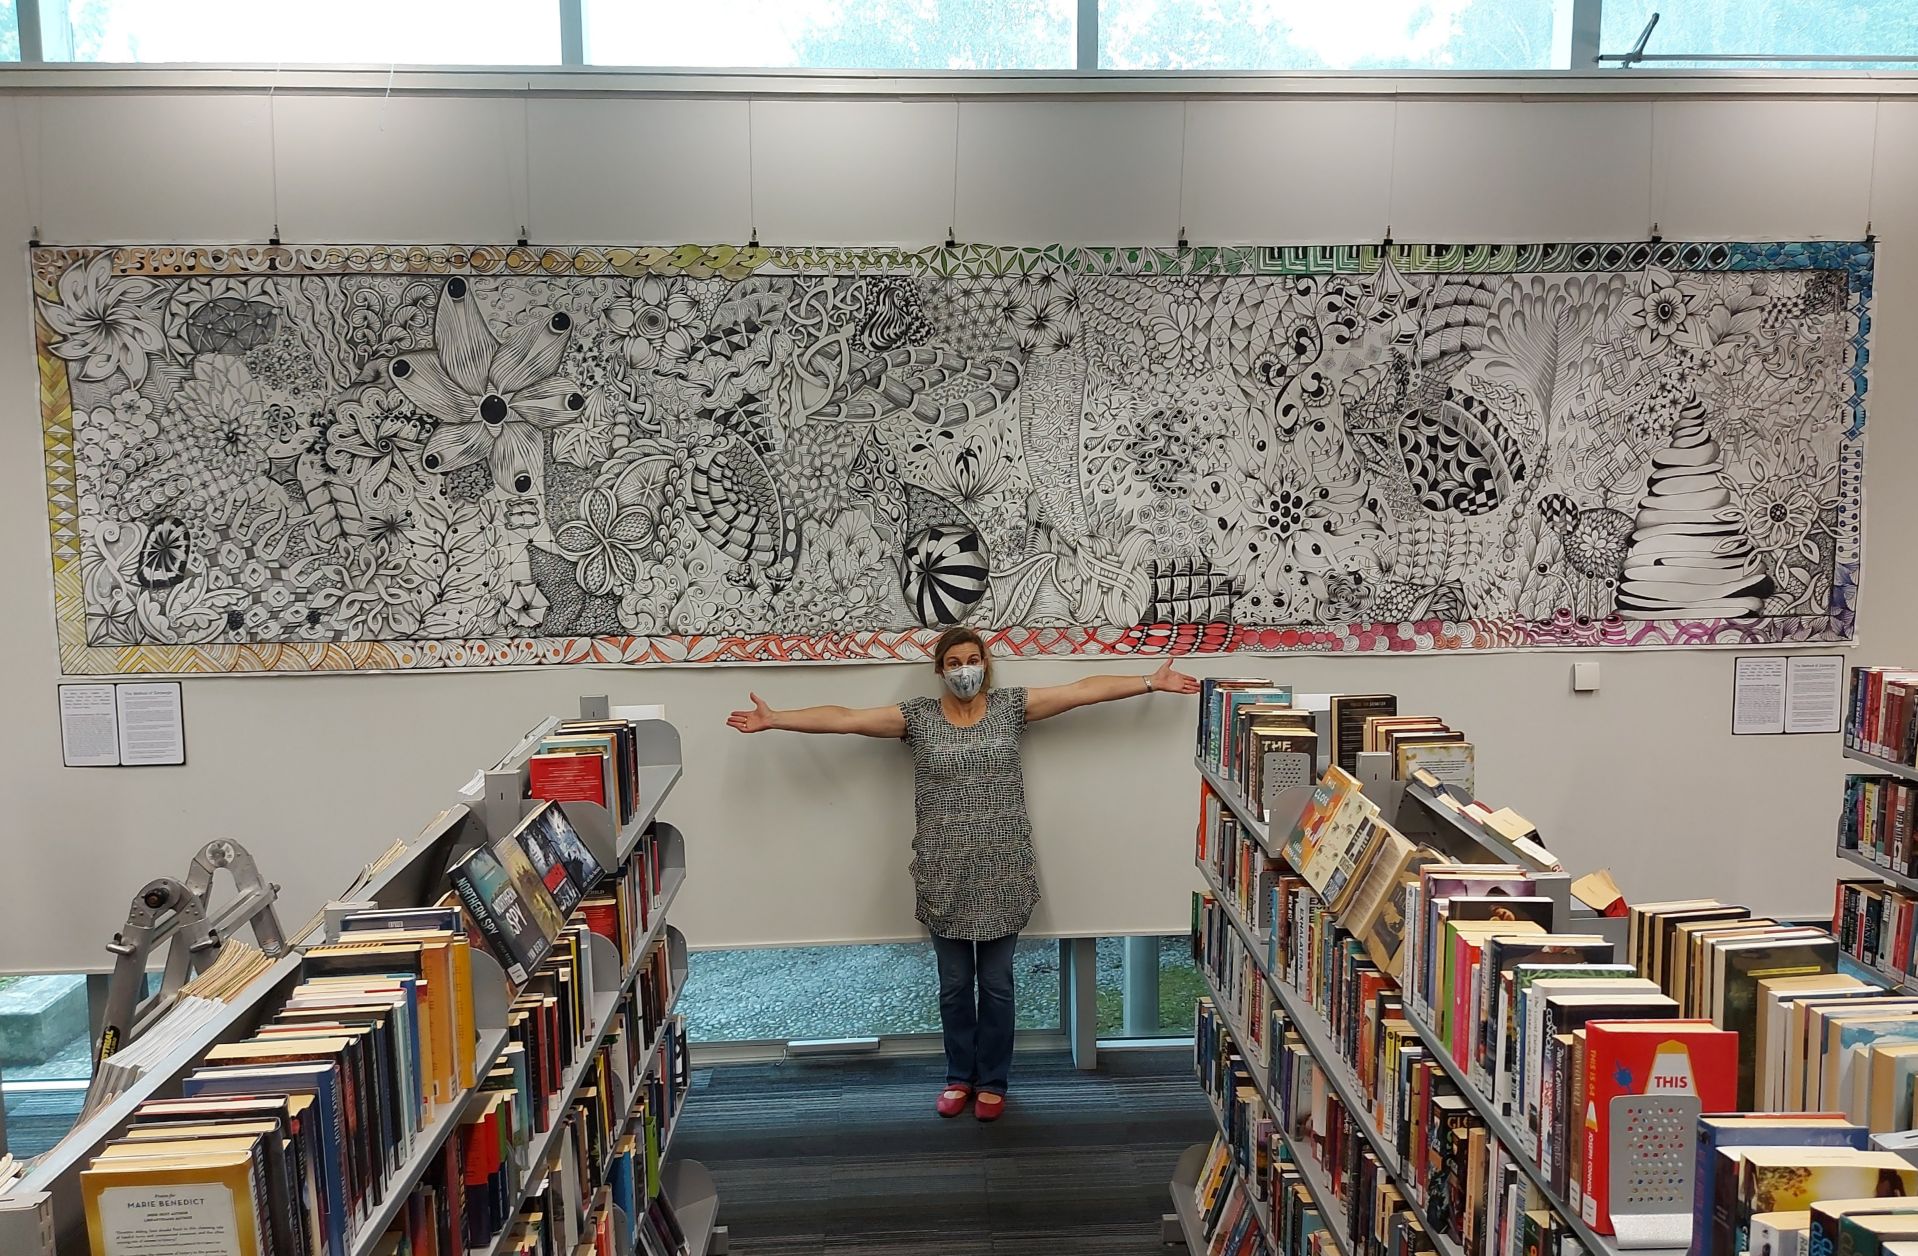
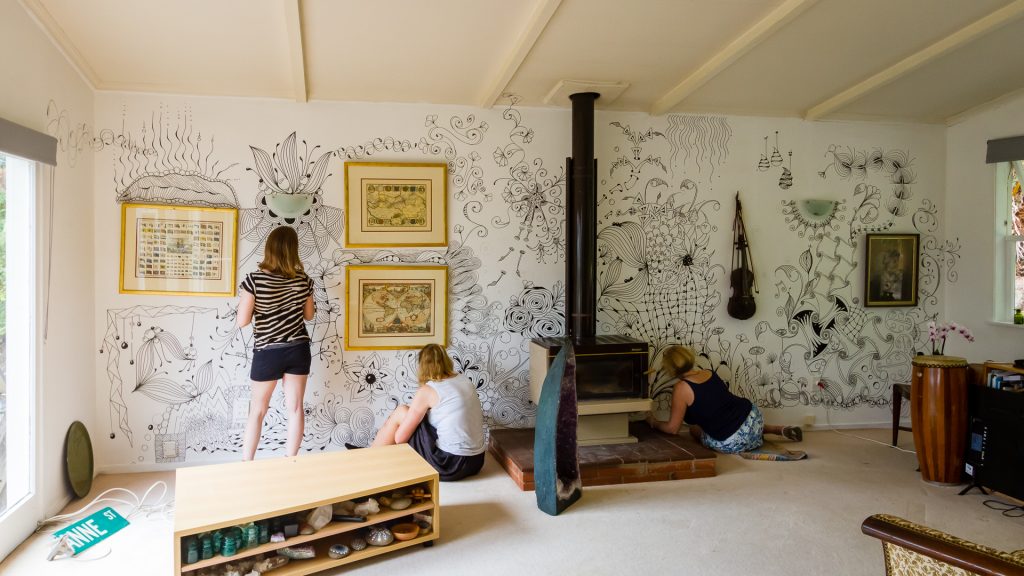
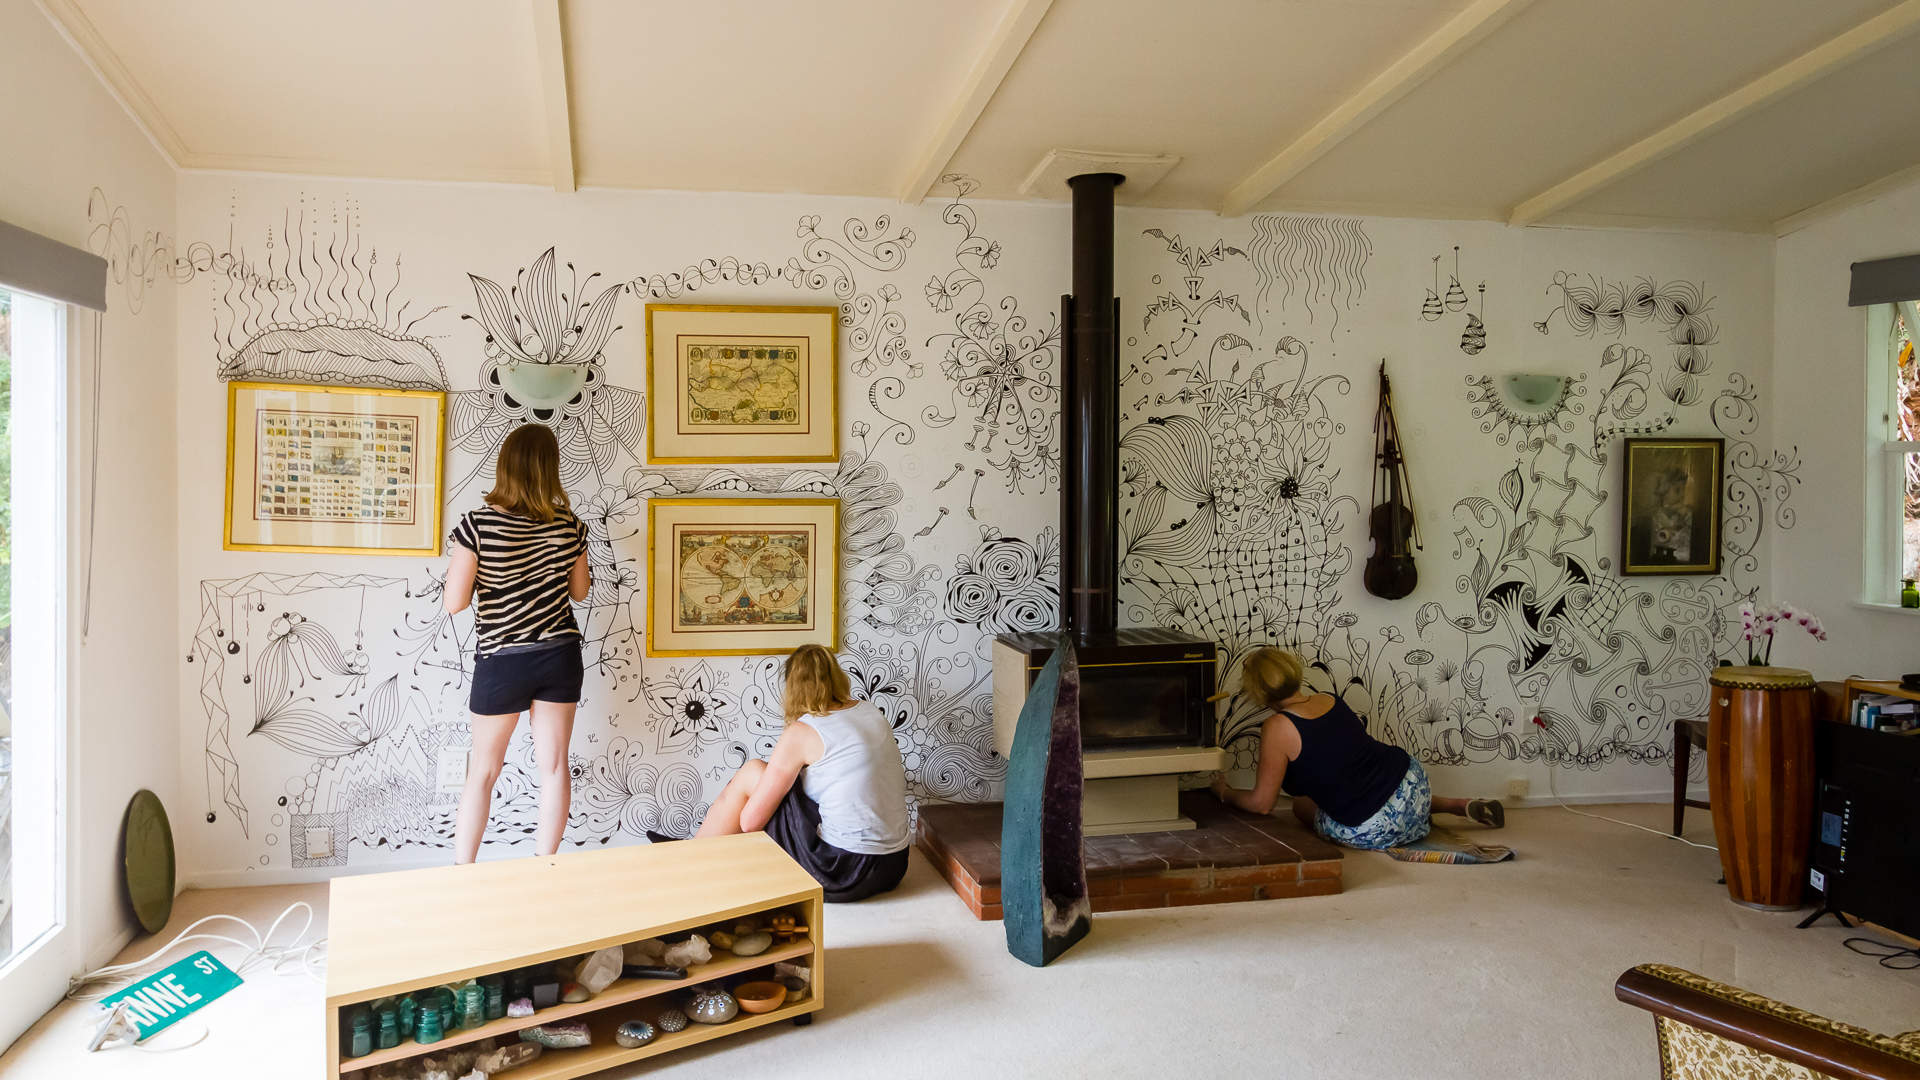
TangleatioNZ and Life in Vacant Spaces have joined together for a creative community project over five days in September, to ‘tangle’ some patterns on the wall at LiVS’s site in Waltham. So…..
Do you tangle? Have you considered going BIG scale? – If you already tangle, come and add to this collaborative group work on a larger scale, and add your favourite tangles, and learn some new ones!
Do you not know what tangling is? Well come and see what it’s all about – and bring a friend too! If you can hold a pen and have a spare half hour to do something creative that will make you feel better, then join in this free community collaborative project to ‘tangle’ a wall. Ildica will be on site to guide you through how to ‘tangle’. Even if you don’t think you can draw, you may find you take to this wonderful drawing system easily with its step by step process.All materials, full instructions and inspiration given.
If you are a beginner or just starting out, I will be on site to guide you through how to ‘tangle’. For those new to it, Zentangle is a an easy to draw pattern based drawing process, – so bring yourself (or selves) and we’ll get your creative juices showing on a large scale. Full instructions and inspiration given. Even if you don’t think you can draw, you may find you take to this wonderful drawing system easily with it’s step by step process.
Tues 28th, Thurs 30th September and Sat 2nd, Tues 5th & Thurs 7th of October from 2pm – 7pm each day.
35 Hassals Lane (site of the old Seven Oaks School) in Waltham.
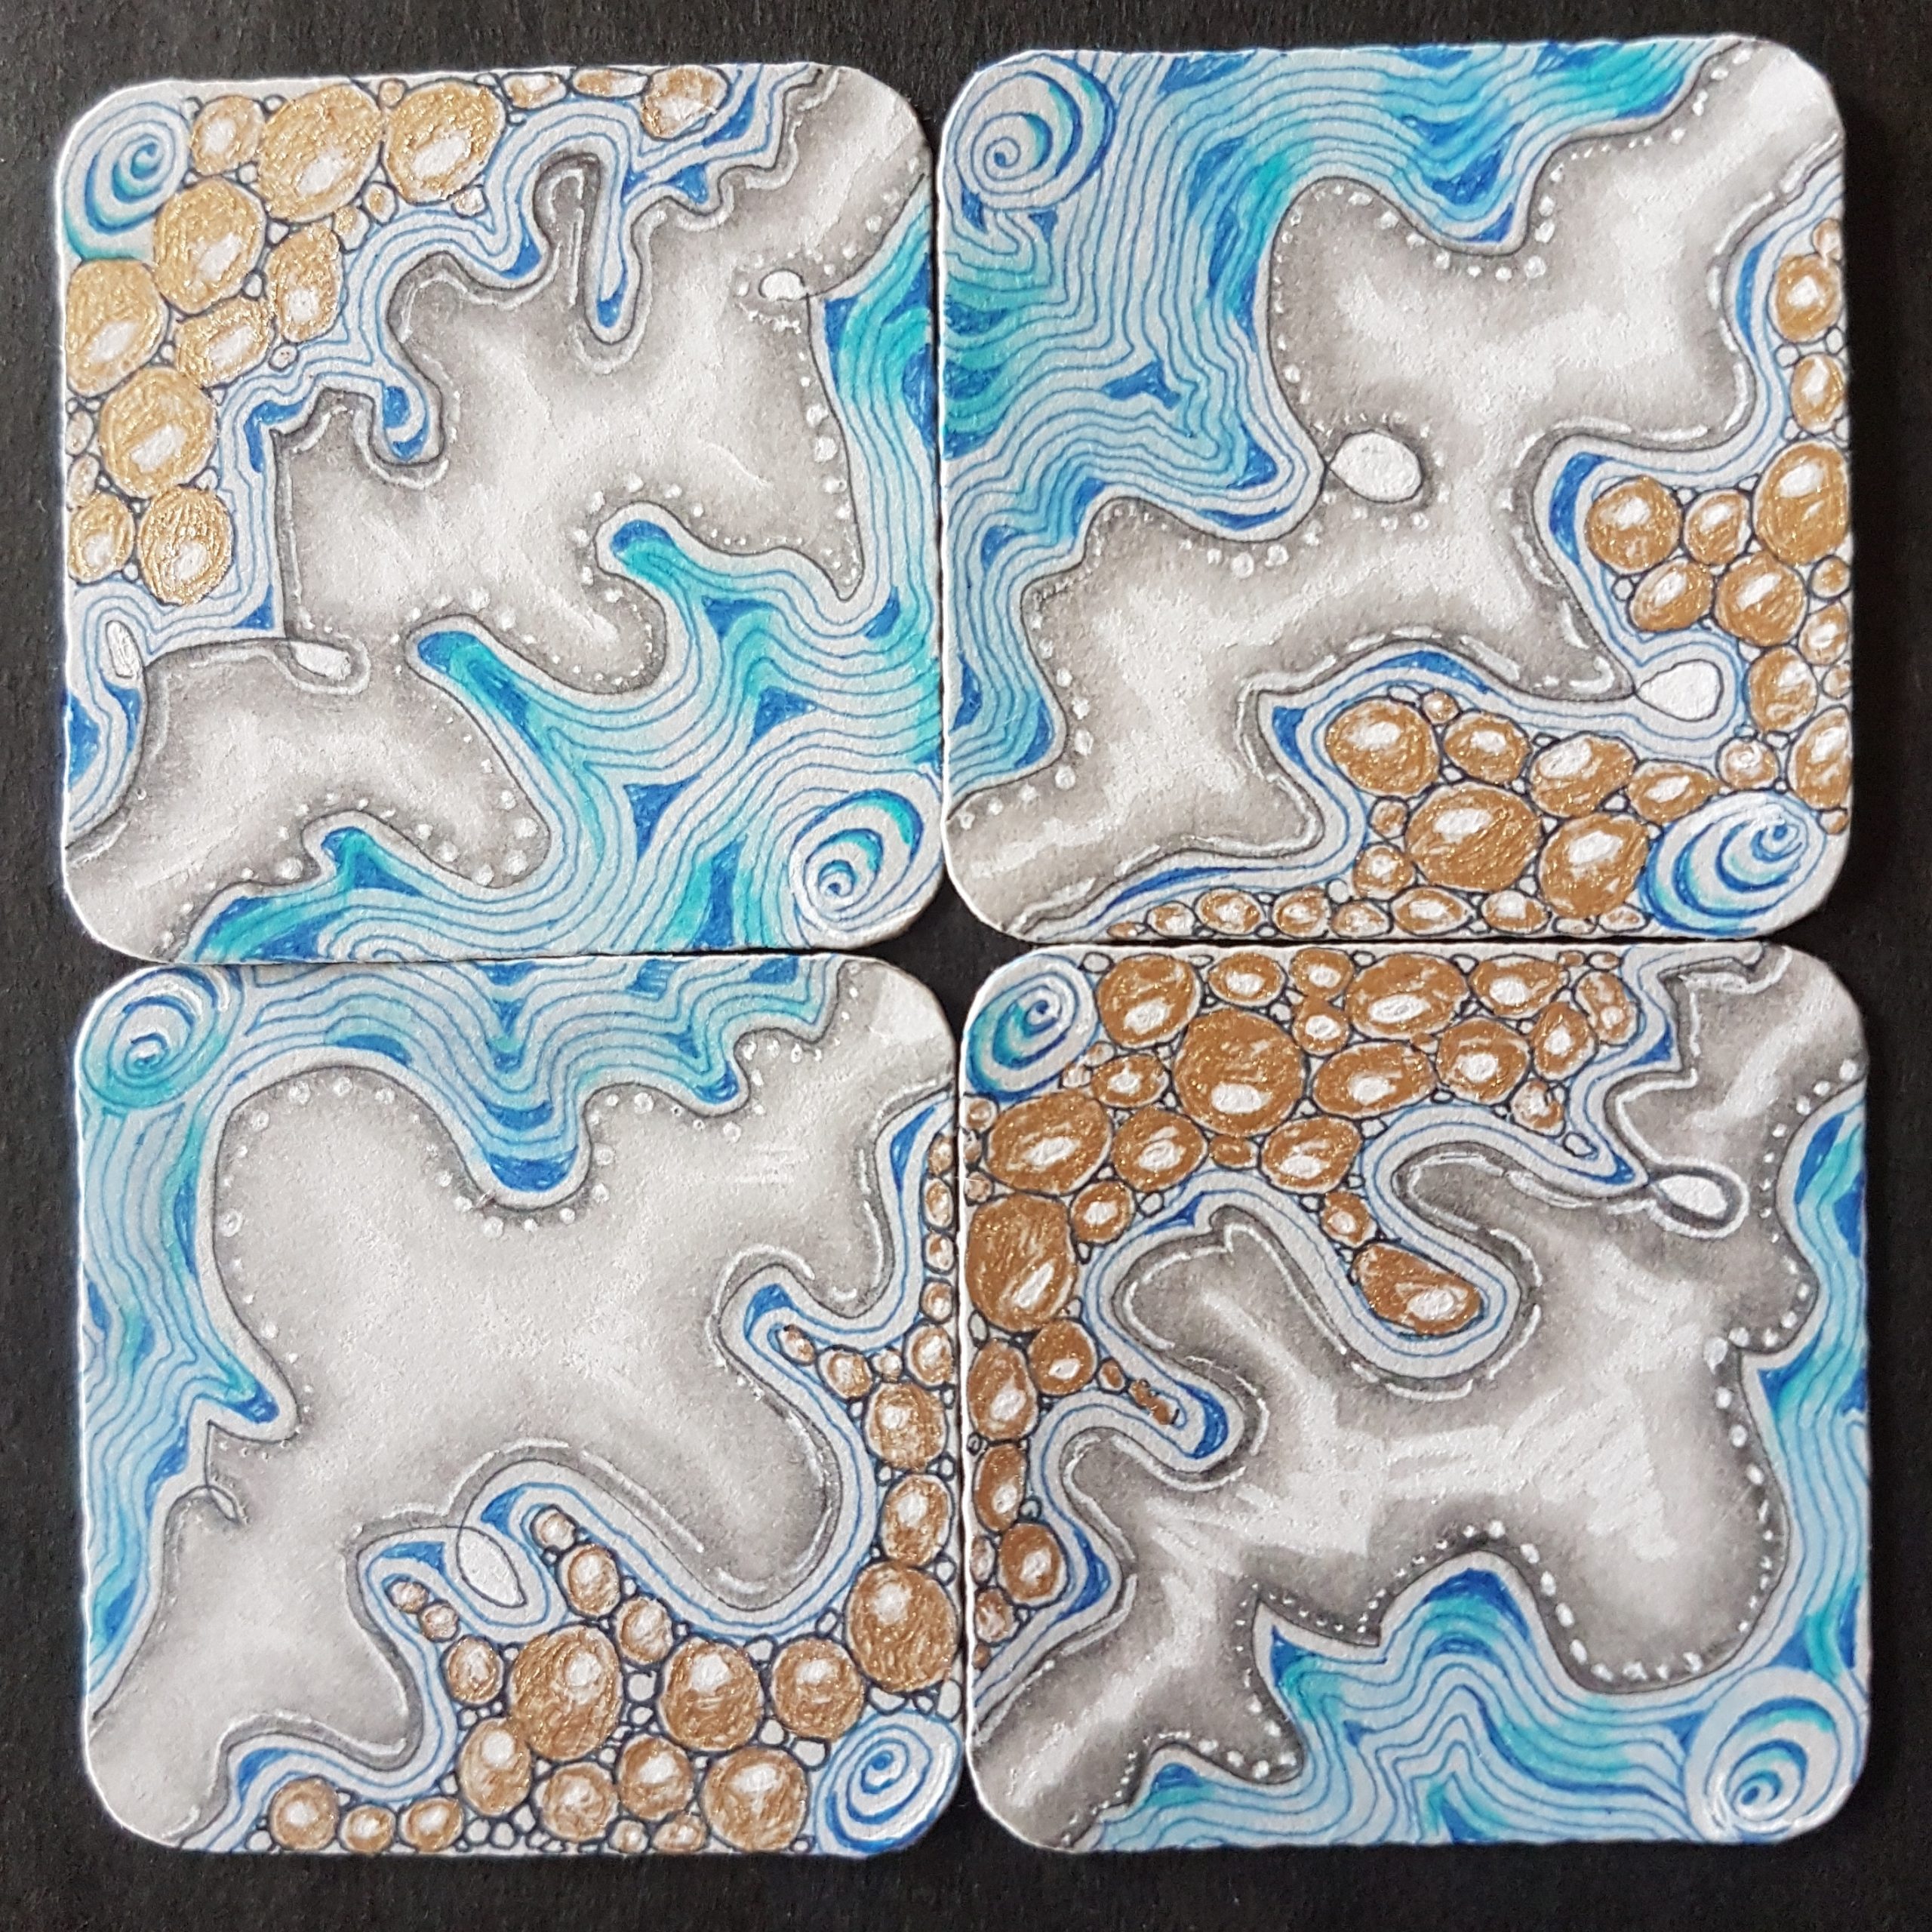
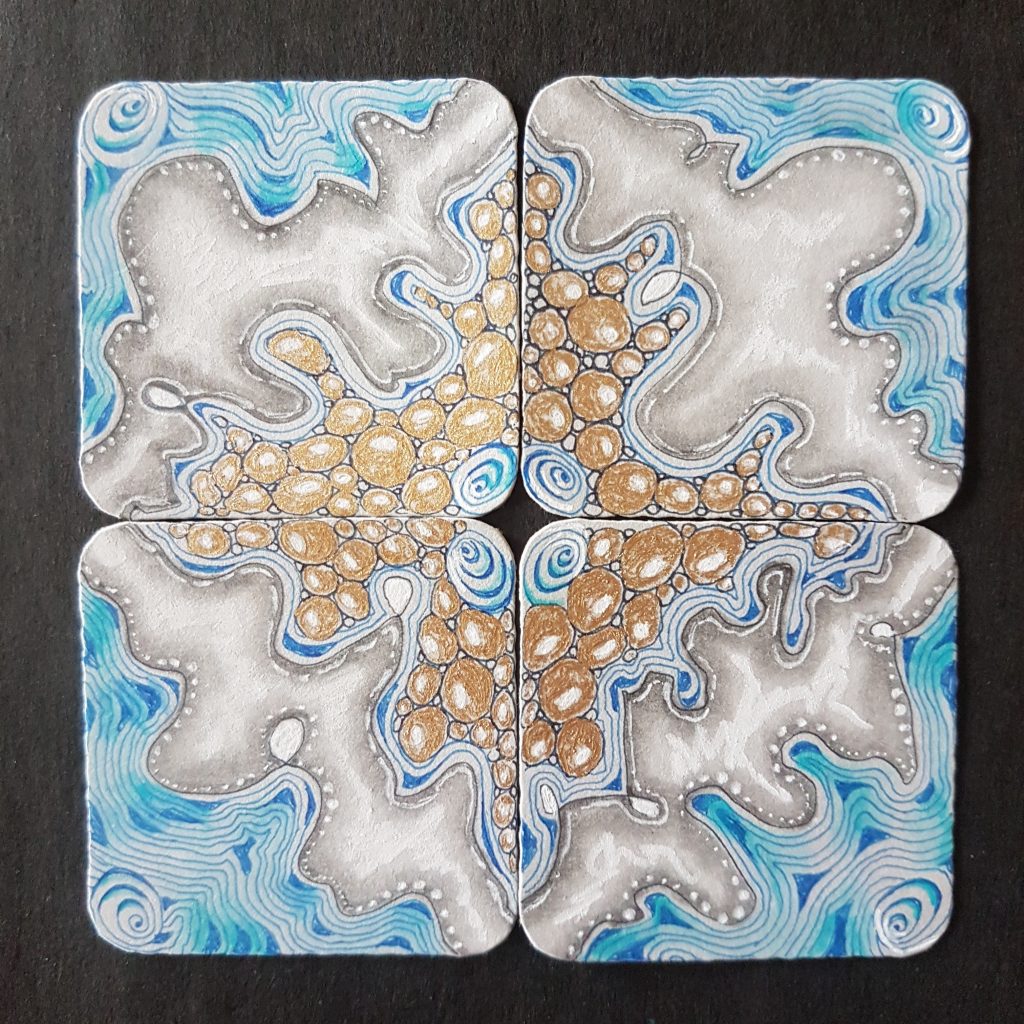
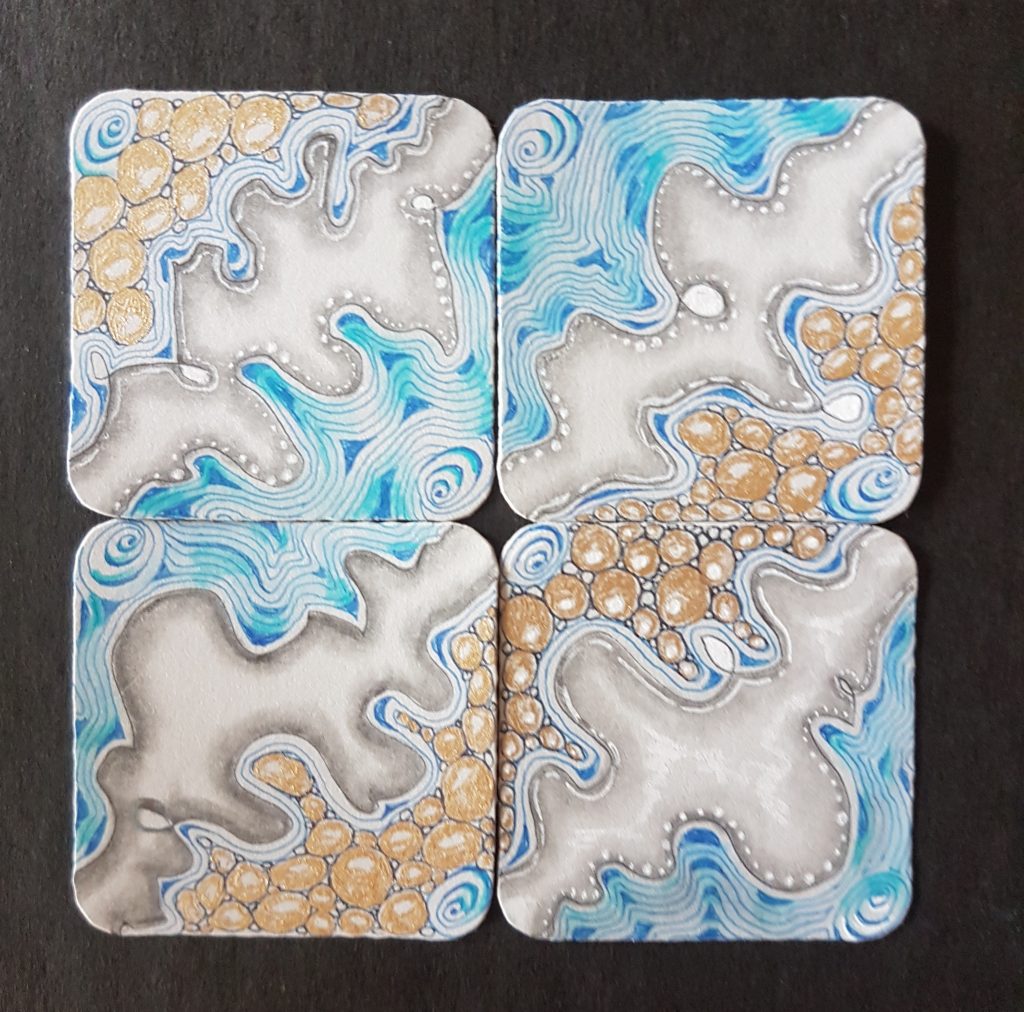
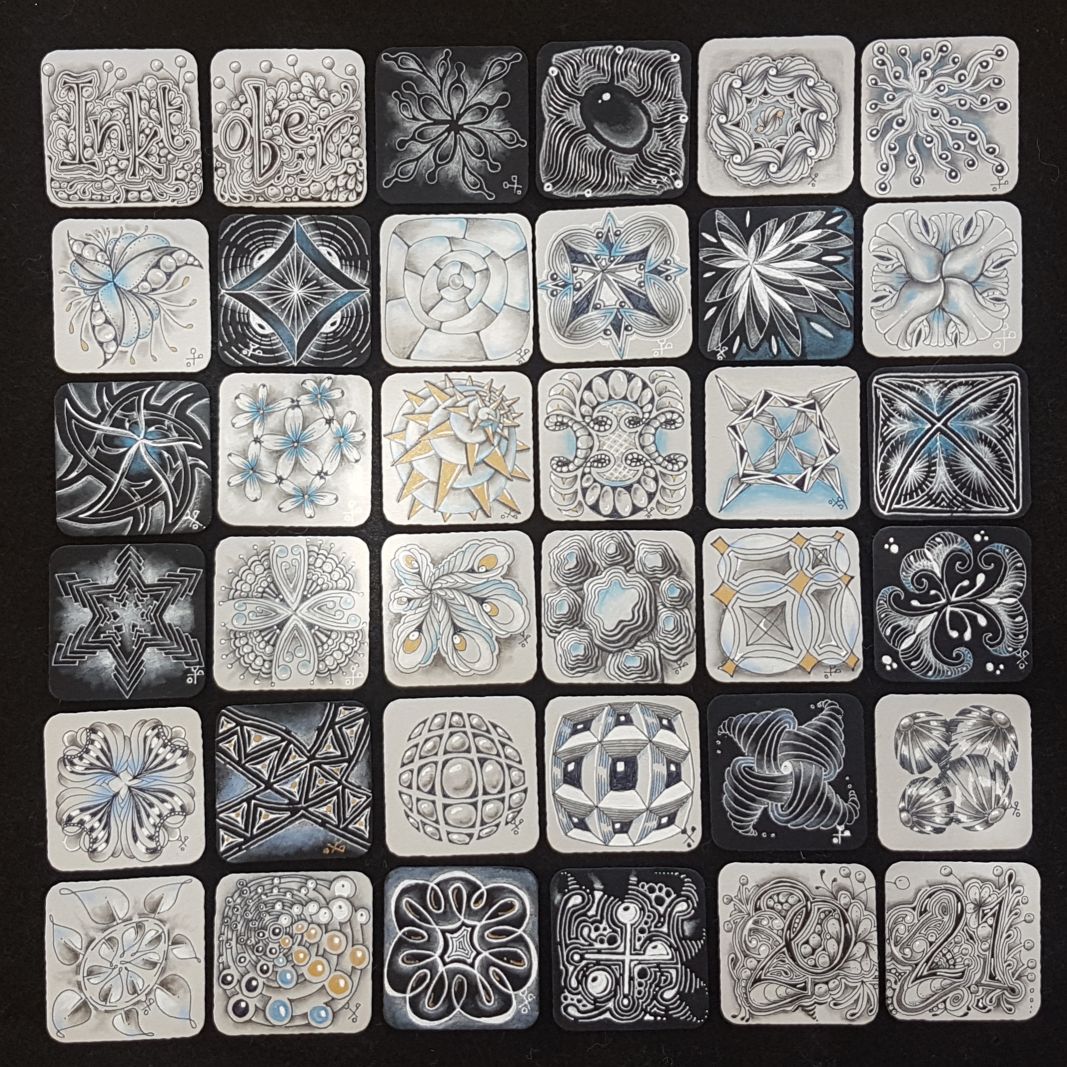
As New Zealand moved into lockdown having been free for 6 months, I thought I’d head back to making things simple. So a nudge to not making life complicated, something to do when you headspace isn’t quite focused. One tile, one tangle, often known as a Mono-tangle. It’s an ideal vehicle for going back to the mindful roots and focussing on the here and now of Zentangle, as you reduce the decision making, putting down one stroke at a time, especially easy with a tangle you know really well. This produces a flow from your pen and encourages your creativity. If you feel under pressure you might just build the tangle on the tile, slowly branching on each element, stroke by stroke, great ones to try are Tripoli, Munchin or Huggins. or you could go a little ‘Crazy’ Huggins……
Or perhaps you want to play, like this wee tile with Printemps. A gorgeous spiral tangle, beautiful for filling in many odd shaped sections of your string. So take each section and draw it with a different attribute, so by the time you have finished you’ll have many tangleations.
Here are some prompts to think about if having an easy play with the tangle Printemps:
– weighted lines – big and small together – overlap – grid like – round – ovals – egg shapes – with sparkle – with drama – with background, – different rotations, – heavy dot in the middle – and we haven’t even got to shading options.
Take a moment and a little space for yourself and pick up a tile your favourite tangling pen and enjoy tangling with your favourite tangle!
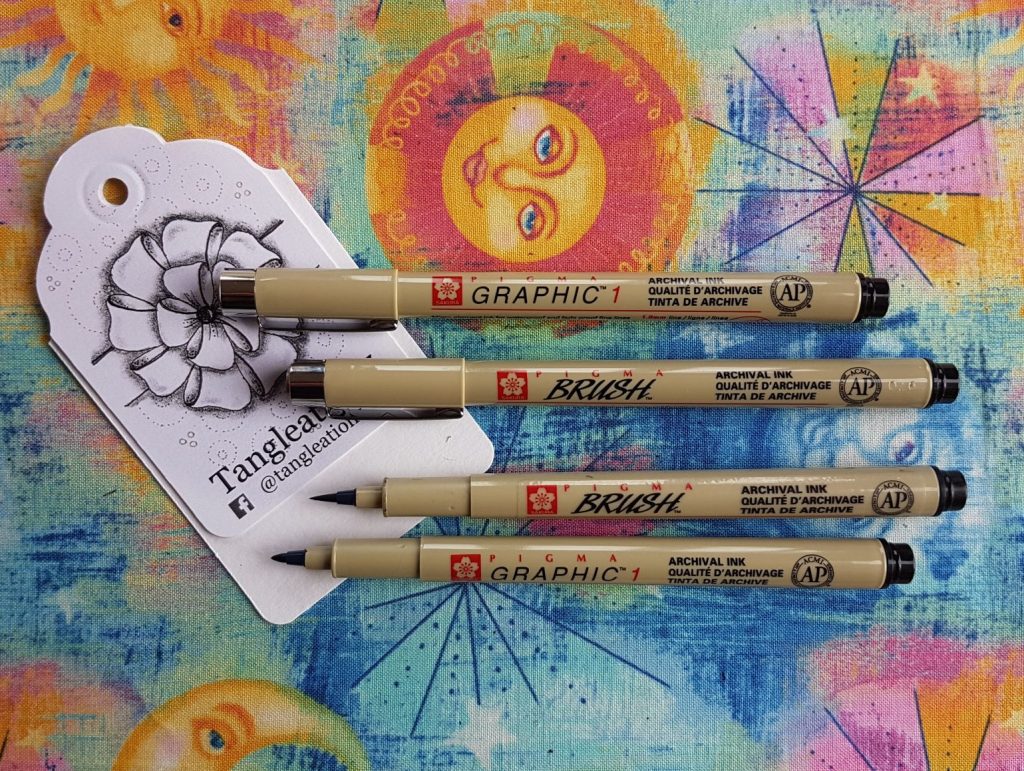
Thought it would be a little bit of fun to explain what exactly a ‘pigment’ ink is, and why it’s the best ink for tangling.
A little background – there are two types of colourant in ink – dye and pigment, and either of these two can be used in a carrier/binder, be that oil, solvent, water or a gel. Please note it’s not quite a simple recipe of two items, various things can be added like gelatin, lubricants, surfactants, solubilizers, resin, gum, shellac, soot – the list goes on!
Colourants
A ‘dye’ colourant has smaller colourant particles, is water soluble, and can make vivid bright colours. It’s cheaper than pigment inks, but doesn’t have the same fade resistance as a pigment.
A ‘pigment’ colourant has a larger particle size, they are waterproof, although may use water as its binder, but once dry won’t move. Although not as bright colours can be achieved, on most papers they will produce a sharper line, as the pigment tends to stay on the surface not bleed.
Small Note – Paper also matters, as a basic rule high ‘cotton’ based not ‘wood pulp’ based paper also helps stop bleed.
Binders
Oil-based – generally used in ballpoint pens, thick and sludgy, great for working on rough surfaces or glossy paper, but does take a wee while to dry on some surfaces – so don’t smear it, but it’s a cheap versatile ink, but often with limited colours.
Solvent-based – used in permanent markers (you know the type – they smell) – e.g. alcohol based pens, made with dye ink as they hold a more vibrant colour range.
Water-based – probably the most common – used in fountain pens (dye), for drawing pens (dye), Pigma Microns (pigment), India ink (pigment), calligraphy (pigment), rollerball pens (can be either pigment or dye, so check the label).
Gel-based – used with a large roller ball pen system but will normally use a pigment colourant, so will give a strong colour and smooth line. Excellent for working on porous surfaces (pigment will sit on top rather than bleed into the surface).
So what does all this mean from a tangling perspective?
Most well known fine liners are pigment based (Sakura’s Micron Pigma, Staedtler’s Pigment Liner, Copic’s Multiliner, Derwent’s Graphik). Using a pigment based ink will give a crisp non-bleeding line on most types of paper, and once it has dried, it won’t be moved, no matter what you put on it (which makes it an excellent thing to note when doing mixed media work). These pens are more expensive due to the pigment colourant, but they have a long life and are pretty fade resistant.
Where a fine felt pen might not be the best tool of choice is with a surface that lifts off, or other pen ink isn’t quite dry yet. For example a glitter based paint, as the small glitter particles can clog up the felt nib – so either use a black gelly roll (thicker ink, different binder) or a plastic nibbed pen. (You may still require a pigment ink not a dye ink, if being waterfast is required.)
If you want to work on more than just paper, a gel based ink is not a bad choice, its thicker properties mean it adheres to the surface (although will take longer to dry) and so is pretty versatile for various ‘odd’ surfaces. Note that you should keep all your gel pens stored flat, and the lids tightly on when you finish with them – they won’t work if they get a chance to dry out or clog – although if you find a pen which has dried out and there is still plenty of ink, try wiping it with rubbing alcohol (you can buy it from a chemist), and heating it slightly with a hair dryer or immerse in hot water for a few minutes and you may get it moving again. the gel binder can make it clog up faster, so extra care needed on putting on the lids/ caps.
If you are adding graphite / shading and go over your black ink, you can always take your Micron over the graphite to make it black again. (But note the paragraph above – don’t clog up your fine nib). If you are wanting to colour after tangling, make sure it’s pigment based ink pen for your tangling – an easy route to colour instead of shading is to use some watercolour pencils and then a water brush, as any pigment based ink won’t run. You can also use chalk pencils, but be careful any fixative applied doesn’t then dull the lighter shades of chalk.
Many gel pens have extra ingredients (think Metallic or Stardust or Glaze ranges), so as the pen manufacturers come up with new and exciting things to add – who knows what effects we’ll be able to pull from our pens in the future!
Updated Paragraph (2024) – Refillable Pens
Refillable pens have come back again to the forefront of people’s minds, as we look to reduce our landfill footprint. I say ‘come back’ because while growing up, and I might say ‘still in use’, I have my fountain pen to hand for writing – and my various dip pen nibs and inks for drawing, alongside a beautiful glass dip pen I got in Venice a few years ago. All of which I do use, but there are limits to them, compared to a fine liner, so I found myself using them and the ease which they bring.
Recently a few cardboard pens have appeared though they still have some plastic within them, but now on the market you do see a move to permanent refillable pens. There is one on the market from Tom’s Studio, and I was given one from my partner after debating and watching for a while, and I have to say I am impressed. Tom wanted to make a calligraphy pen for his wife, and it all grew from that small start to a product able to be sold to lots of people – a permanent fine art pen. It is wonderfully thought out tool. Easy to switch nibs and refill the reservoir, and comes with a full tip set (from 01 to 1, and brushes, chisel and bullet heads in various sizes too, but what makes it useful is the ink you can buy.
Having read this article you will have hopefully understood the different types of ink, and although I can use majority of inks for tangling, if waterproof and colourfastness are important to your project I would stick with pigment based inks, which probably suit the mixed media style of tangling and shading with colour. But it’s not that a fountain pen ink won’t work, it will, you just won’t get the same waterproof and lightfastness of a pigment ink. Tom’s studio do a pigment based ink that works with his Lumos and Wren (the fine liner pens) which has worked beautifully for tangling.
If you have the time and inclination, worth having a look at his website, and see if it might be on your next birthday present list!
The Zentangle Method is about reducing the decision making to make it easier to flow, and therefore ‘relax’ as you are drawing. Concentrating your focus on one elemental line, where it is going, here and now, not worrying about the outcome or the bigger picture.
However, one thing starts to come up, people love a little colour in their life – and in their tangling. So once you have got confident with some tangles, have mastered some shading techniques, and are happy using tangling as a relaxing tool, the next stage is often that you want to add a little colour to them.. Maybe you want to decorate a gift tag or make a card, something with an end product in mind, and up comes the idea of adding colour…
When I am teaching about adding colour to tangles, I will often say to stick to the method, but there are certain tools which I would say are helpful to tanglers who want to add some colour easily.
For beginners, If you are not so confident with adding colour, or this is your first foray into adding it, I would recommend buying yourself a set of watercolour pencils (a set of 12 is plenty) this means you can add lots of depth of colour by applying a little colour with a ‘dry’ pencil and then using a fine brush with some water to ‘blend’ out the colour. An easy method to play with, treating your brush as if it’s the tortillon. If you then add the coloured pencil to a ‘wet’ surface it acts more like paint/ ink, so you can get a deeper colour. (Bonus the archival ink pens won’t bleed with the water.)
If you are blending and using colour with normal coloured pencils you will find they are near impossible to blend with a tortillon or a stump, even high waxy content ones, as neither of these paper based products is an ideal tool for the hard pigment/ wax/ binding agent or additives they contain. So instead I recommend using acolourless blending pencil for normal coloured pencils, you can also use a white – but note if working with dark shades, it will (obviously) lighten them a wee bit..
However if using a chalk or soft pastel coloured pencil (they are powdery and are made of pure mineral pigments,) you can blend with a tortillon or a stump. The issue here is often having lots of different blending tortillons or stumps for each colour, so you spend your time constantly changing, or mixing your colours on the tool. (Why often I have a collection of purple ones). So keep these tortillons like a set of coloured pencils. Note – the finished art will need a fixative.
Using coloured gelly pens, this can be pretty effective at adding highlights, and they work brilliantly on black and coloured tiles. The Gelly pen Metallic or Moonlight ranges from Sakura are perfect for this with their vivid colours and white. Reduce your decision making by limiting your colours, you only need a few to be very effective.. Or use these gelly rolls instead of your black pen.
Paper washes, if you want to have all the colour in your prep – then use some inks or watercolours to preload the colour on your tile before you even start to tangle – you can use the different colours as if they were your string. – Yup, keep to the method as much as you can to make it easier for yourself. There are lots of ways to do paper washes, but I think that’s for another post..
And of course, you can always be bold and treat your colouring of your tangling like a colouring book – but this time you aren’t colouring in between someone else’s lines – they are all your own!
I am offering a couple of Zentangle taster sessions – a two hour session for you to have a brief’ have a go and see what this is all about – choose one of two sessions on offer – either Friday 4th August – 12 – 2pm or Thursday 10th August 6.30-8.30pm . You’ll have great fun making your own tile and leave with materials to take home after too.