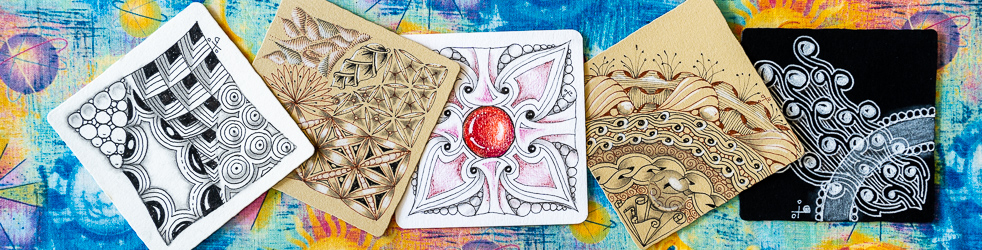
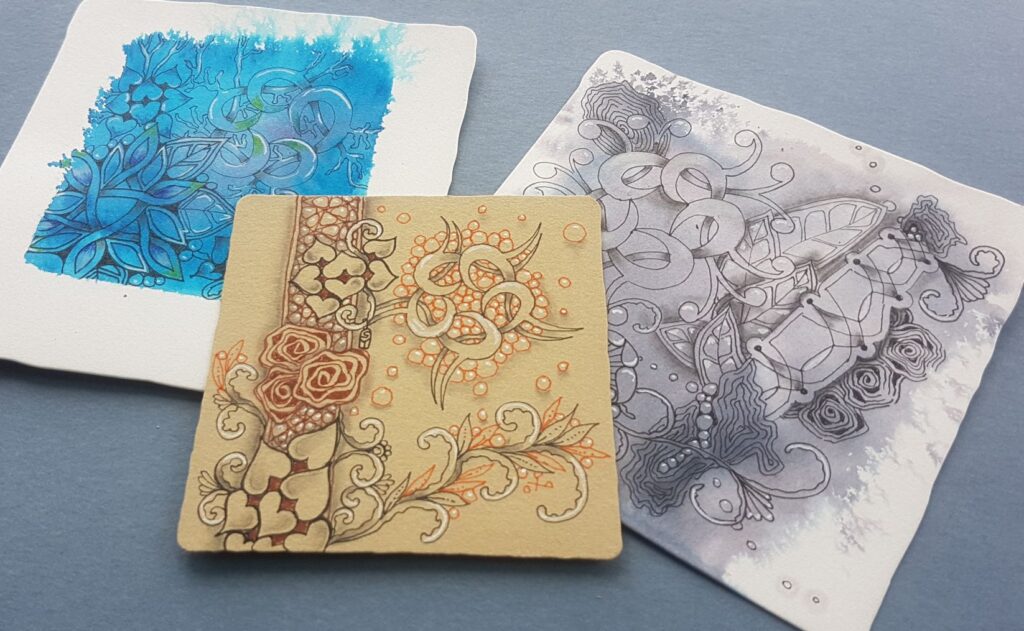
In October I headed off visiting friends and family. First I caught up with the tangling team of 7F5R in Singapore – and how about this beautiful artwork as a welcome present! It was the start of a fabulous and busy weekend of sightseeing, tangling, studio visit, art shop stash shopping, a superb batik textile exhibition and out and about in Singapore; spending time together with friends. My bigger trip continued westward, and being able to spend time with immediate and extended family, as well as catching up with lots of friends in the UK. My Inktober tangling project is woefully behind the diary dates – but what the month did give me, was some tangling time alongside friends and family which I really appreciated.
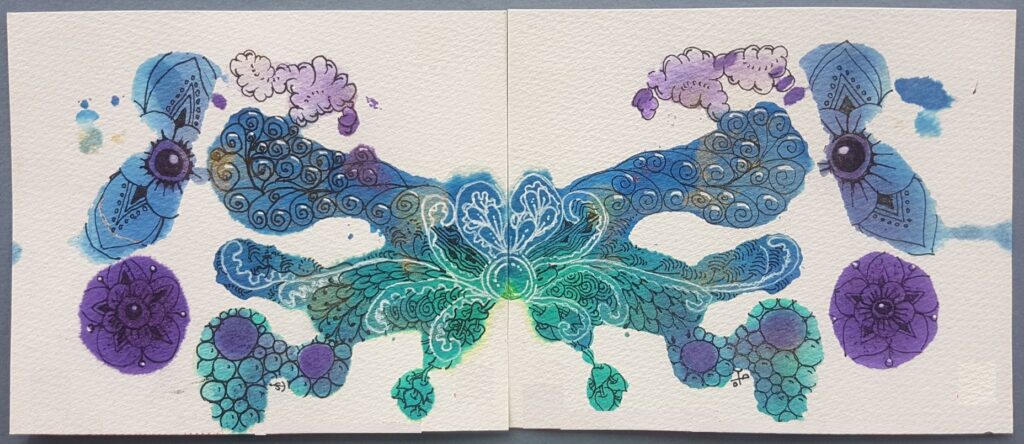
Above is what I got up to with my mum! Side by side we did this pair of tiles, with help from a lesson by Debbie New based on ink blots – Great fun being able to tangle shoulder to shoulder with these mirrored tiles, pre-loaded with Lindy’s Magicals. I have no idea what hidden picture was within this, but I do know I was grateful for the opportunity, and we were entertained as we put pen to paper together. Great fun to bounce ideas and themes off each other to keep them as a pair.
Another way to tangle with a friend is through a swap or traveling tangle.
Starting a tile and then letting someone else finish it is a quirky way of recognising that you should trust your tangling capabilities (and the Zentangle Method). The experience of taking yourself outside your comfort zone of ‘only your own’ tangling, when you are faced with finishing off someone else’s start can feel daunting – but trust it. I will often add this ‘swap’ project as a bonus in some of my sets of lessons, or add tiles to outgoing orders of materials. It’s interesting to watch how the tiles expand in different ways and how they finish up. Definitely worth trying with a friend.
However you don’t need to be close by – you can always send one in the mail to a friend and get them to complete it – which I did with three beautiful tiles sent to me from the 7F5R team – Debbie New, (creator of CZTAE), Stephanie Jennifer (creator of Inktober Tangles) and Susan Yeo, before I caught up with them in person. So if you want to branch out and find some new tangling friends you can join Traveling Tangles – a FB group set up to do just that.
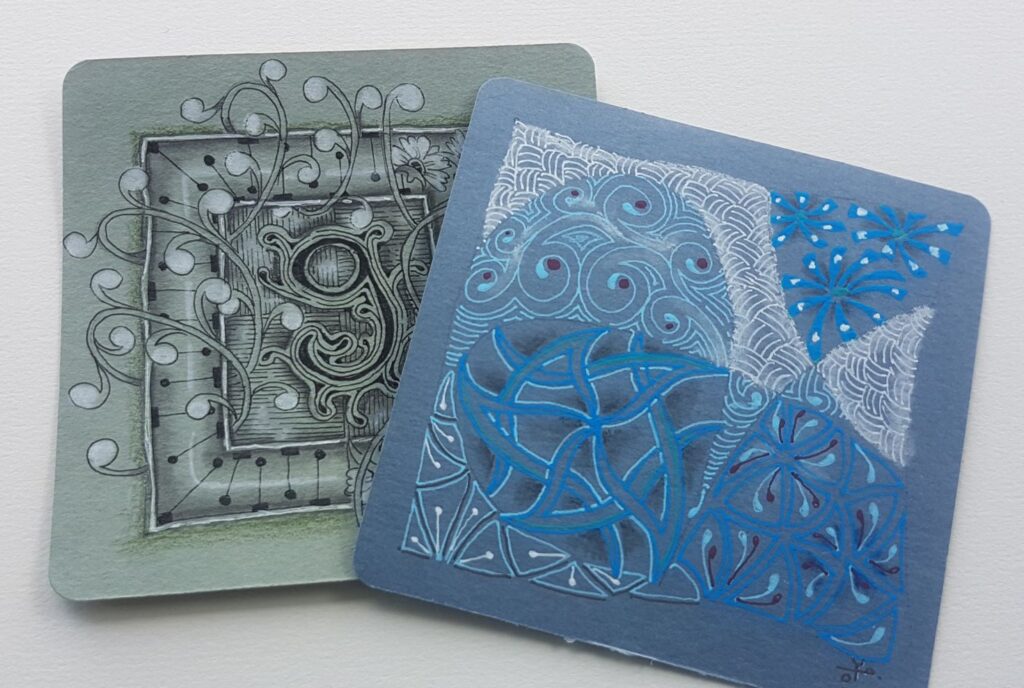
And continuing on the theme of friends, in my shop I have had to say goodbye to a friend – my cream paper has had supply issues that I just can’t resolve – so instead, say ‘hello’ to two new tiles – in green and blue tones. Available in my Artist tiles or the 8-point Star tiles These work well when using a traditional micron pen, graphite shading and white highlighting; or you have options go bolder – the blue tile was completed with moonlight pens, which work brilliantly on coloured papers (below I used the Earth Moonlight set). The Jewel and Earth Moonlight sets have a fine 06 nib (0.3mm) and as we don’t want a lot of colour decisions with tangling – a wee set can be just the ticket.
Various widths in the Sakura range from 005 (super fine) to 12 (big and bold) I stock black from 005 to 08, and then two ‘drama’ pens a Graphic 1 (equals a 10) and a Brush pen, all with the same pigment based ink which sits on top of the paper rather than soak in. This archival ink is perfect for long lasting, and also means that once it is dry you can add a water based watercolour, pen, ink, Lindy’s Magicals medium etc and the pen ink won’t move from whether it was put down.
Most well known fine liners are pigment based (Sakura’s Micron Pigma, Staedtler’s Pigment Liner (with a squarer tip), Copic’s Multiliner, Derwent’s Graphik). Using a pigment based ink will give a crisp non-bleeding line on most types of paper, and once it has dried, it won’t be moved, no matter what you put on it (which makes it an excellent thing to note when doing mixed media work). These pens are more expensive due to the pigment colourant, but they have a long life and are pretty fade resistant.
For more information on pen care check out this article
There are many variety and makes of Gelly rolls on the market, some of the cheaper ranges don’t have a lot of ink within the pen, but if you find you don’t use them much perhaps this is away to go. Various different Sakura ranges to choose from which I have described below, but also Pentel do the Hybrid Gel (gold silver and white) Uni Signo is another popular brand – Gelly rolls are more prone to drying up, so store them flat and out of extreme heat where possible. I have described below are the different Sakura ranges of Gelly Rolls.
Moonlight Gelly rolls
Solid colour works on coloured tiles as the name suggests gel based inks which use a pigment colour but not necessarily a fine line. The Sakura Gelly rolls I stock are many the white comes in a 05, 08, 10 weights, if you aren’t good at cleaning off the nib after use be aware of the 05 – the 08 and 10 are a bit more forgiving. Worth trying to make it a habit to clean off and roll round the ball in the nib and few times after use if you are working with a mixed media surface – after I have been doing this, I always seem to have endless pen marks over the back of my left hand!
Metallic Gelly rolls
Same as the moonlight range of solid colours, but these pens give a solid smooth metallic finish – perfect for a shiny metallic highlighting or filling in a line. Great for larger areas too.
Stardust Gelly rolls
These gelly roll pens from Sakura give a twinkling effect. While the Metallic range provide a more uniform pearl finish, the Stardusts’ twinkle! Brought about by tiny fragments of glass that reflect the light, these inks constantly shimmer.
Line width is 0.5mm, with the usual smooth writing, dense ink and constant ink flow you expect from Sakura. These are stunning for birthday cards and artwork that needs a bit of dazzling! I might add if you photograph it, the twinkling doesn’t come out, you might need some special filter to show that off!
Shadow / Luxue Gelly rolls
They flow out as a colour – Pink, Lavender, Green, Blue or Black, but as they dry, (give them 2-3 minutes to fully work,) they dry in gold or silver with a fine shadow of the original colour around the outside. They show up best on a more absorbent paper. Smooth writing, constant ink flow to the end, waterproof, fade resistant and chemical proof. A little wider than the rest of the range – mainly because of the two colour effect.
Glaze Gelly rolls
Also known as Soufflé pens, these are the ideal pens for working on the TranzlucenZ tiles! These Sakura pens give a 3D stained glass effect, and it’s possible to use them successfully on non-porous surfaces such as plastics, glass and coated papers. Line width 0.6mm. For best effect work slowly and leave for 2-3 minutes to dry completely, and build the 3D effect. These pens go on semi transparent, which may be a bit different to other pens you use, so give it time to dry and build the colour. They come with a little inner cap as well, I tend to keep these on after each use, as I don’t use them for every day use. Note there is a ‘clear’ glaze pen which can be good for putting over coloured pencil etc, so can be a useful tool for using with other mediums to get a glazed final look.
For more information on gelly roll pen care check out this article
Pencils
Traditional Graphite and white pencils
Most people adore their short cute original Zentangle – perfect for fitting into the palm of your hand to keep the point just where you want it, it is a nice quality HB. It’s pair for highlighting (ideal on anything but white tile) the Zentangle white charcoal pencil. This is a pastel pencil (both of these are General’s pencil brand and are in most people’s Zentangle kits as they are small and easy to carry anywhere. I tend to stick mine in a double ended pencil extender when they get too short to handle, and so get life out of them until the very end. Some people (and that would be me included) as they are more confident about the shading may move to a 2B – I like the quality of the Staedtler Mars Lumograph range, but I know others who go down the 8B route – clearly they LOVE their shading. There is no one best pencil, people style, heaviness of the pencil pressure and paper can all make a difference to how it looks, so like paint, sometimes you need to pair a pencil with the paper you have – so a wee trip to the tester station in your local art shop is not a bad afternoon experimental trip!
If you want to write / label the back of photographs, a pencil is the best tool, not a pen so I found out.
Coloured Pencils
For beginning to work with coloured shading in your tangling, I recommend two options, coloured pastel pencils and water coloured pencils.
Pastel Pencils
If you go down the coloured pastel pencil route you will then need matching tortillons to pair with them, which is fine, but be warned they all come out purple in the end no matter how you try to keep them separate tones! I like Kohi Nor Gioconda range, I find the Faber Castell’s Pitt pastel quite hard, the General’s Pastel Chalks and the CretaColor Studoline pastel somewhere in the middle, so find what suits your pressure and paper. (and of course what range you can get hold of local to you!
(I like using the Gioconda pastel white for highlighting on coloured tiles too.)
Watercolour Pencils
Or buy yourself a set of 12 water-coloured pencils and a water brush, which you can then add the watercolour to the area you want the deepest colour and then use a little water to gradually pull some colour across an area. This is a fast technique and doesn’t require a fixative afterwards, but does need drying time. Be careful not to get your pencils wet otherwise you will result in a BIG dose of watercolour paint going on the tile – which may be what you want but just a warning. Easy to add water and blot off if you change your mind or feel it is too much, or when over a line you didn’t want to.
Once you have mastered the water colour pencil option, there is a more permanent ink solution in Derwent’s beautiful Inktense pencils – this is a pigment ink (so won’t fade, and you can add colour like the watercolour pencils, but like the name suggests, these are much stronger, so last for ages, and is often a case of collect one or two pencils at a time and build up a collection. Often with Zentangle work, you are limiting your colour palette anyway – to reduce the decision making, so this is not a bad acquisition method.
Inktense also come in a block form too, and I use these for colouring my wall tangling borders, as otherwise it would take me years to add the coloured borders! Water based, but when dry doesn’t move and easy to use your tangling pen over it.
Traditional Coloured pencils
There is quite a range out there, and if you are used and already have a range of coloured pencils then by all means use them for your tangling. I’ll admit I don’t use them a lot, but if I am going down a waxy pencil I use my Prismacolor set and if I am going down a less waxy coloured pencil, I use a Derwent Blender which I find is great to use on a traditional coloured pencil when used in a tangling context. Alternatively if you are struggling to blend, you can dip your pencil in a wee pottle of Vaseline (my chemist does a tiny handbag size pottle) and that is great medium to mix the colour – if a little less easy than the purpose built blender pencil!
Other Types of Pen
For working on Ceramic surface – I love the Edding Porcelain brush pens – 1-4mm width, if you are fine with a brush pen these are excellent.
For working on glass, ceramic, wood and metal – Sakura Identi pen, I stock these in black but they do come in limited range of other colours.
Wall Tangling – big scale tangling – the Edding 300 series – 1.5- 3mm tip, brilliant permanent marker, which doesn’t bleed on papers and is great for big scale tangling! I love these for the big work. works well on most surfaces (think tagging buildings) Although when I want to do a large amount of drama fill on something you’ll find there is always one lurking in my pencil tin! I have also had a lot of fun with a Posca pen for some permanent outdoor tangling over paint!
Talking of bigger scale and multi surfaces the Sakura Pen Touch in gold and silver are great tools, you need to shake them to mix the ink, – they are not a fine line tool at all, but great for large areas and they have an opaque ink that works on most surfaces- wood, plastic. glass, metal, leather, porcelain and rubber.
Colouring in – options here include Tombow Dual Brush Pens – for coloured pen work most people use these in the tangling world, very wide range and blendable, you can usually pick them up solo and add to your collection, and permanent ink. Again I sometimes use them on Wall Tangling canvases, with the Brush tip end, so highly versatile with the double ends and great for big colouring in. For finer work people may have a brush pen set or Staedler’s fine liner sets, which are affordable and a wide range of colours. Koi Brush pens are another lovely option suitable to diluting with a water brush for a blending technique.
If you think I have missed a surface to draw on and the pen that you find is great, let me know!
The start of 2023 also brought me the unexpected joyful but humbling experience of being selected to join the Zentangle.com’s CZT Family Tree. I was partly focussing on my Community Wall Tangling work and it was great to read a few CZTs thinking they might try the same thing local to them. If you want to read the full article, you can read it here. And get in touch if you’d like some help with setting up one of your own.
As people from all over the world expand the technique, newly created tangle patterns are given different and unusual names. Additionally a whole vocabulary of terms and techniques have been born through Zentangle, or adapted with a Zentangle context. So to help, I have put together a comprehensive glossary of tangling terms on my website, so the new-to-tangling can understand some of the terms spoken that perhaps experienced tanglers might be talking about. Check out the Zentangle Glossary Also in French, German, and Dutch.
Tangle pattern names often have strange spellings. Tangle creators usually invent a new name for a tangle to make them different from existing words – certainly that make it easier to locate them online.
Their names may be given in honour of a person, influenced by the location of where the tangle came from or where the original pattern was spotted before it was deconstructed. Or perhaps there was a story, a moment in time that the person deconstructing the pattern that resonates with the tangle. Sometimes coming up with the name of a tangle can be just as much fun as deconstructing it, and new ‘fantasy’ words can be fun to build, just as much as creating a new tangle pattern.
Although there are tanglers all over the world creating new tangles, it is great that they can use word-building for naming tangles to step over language barriers and communicate across the globe with patterns.
And because however comprehensive I think it is, at the bottom of the glossary page – there is a submission form box. So if there is a term you have come across that I haven’t included – please do let me know so I can add it. If it is a technique that can be attributed to a person, do let me know who that was – always good to acknowledge who started it. I imagine this is a resource that keep building as the community of tangles and tanglers builds too.
Recently both in an online forum and an email direct to me, I was asked about the copyright of patterns. So I thought just penning my thoughts here might be an idea.
A tangle is a pattern that has been deconstructed (by someone) and it is let out in the world for others to use as they wish. It is always nice if you can attribute a tangle to who deconstructed it if you promote it on social media – it’s just a kind thing to do, either with the name of the person, or the tangle name. Patterns have been out on this planet long before us humans got here, nature shows us some beautiful examples, through leaves, flowers, snowflakes, lichen, shadows, water reflections. Patterns are everywhere.
Where a pattern is turned into a logo, or a piece of art designed it can be copyrighted. If drawn by you and is totally your own work, you hold claim over the image.
If you do an original piece of art, it’s yours. You can do with it as you wish. (You can give credit if applicable to the tangles if you post on social media, but the drawing itself is yours. Compare it to drawing sunflowers, although when we think of a drawing of sunflowers, most people will instantly come up with one artist associated with ‘sunflowers’ but it doesn’t stop anyone else drawing them. So if you draw a ‘tangle’ design of your own composition, do with it as you like.
Where you can run into naughty territory is if you take someone else’s composition, and draw it in the same way, although ‘your drawing’ is yours, the ‘design’ of the drawing is someone else’s therefore you would need to credit it as such. For example if you saw a piece you liked and copied it, or if you did a lesson by someone, credit them, they are the ones that came up with the design idea.
If you are are then going to profit from this artwork, you’ll need to get permission, because you can’t honestly say it is ‘all your own’ from beginning to end, and although you can promote your drawing it should be with a credit to who helped you get there.
Say for example you have been asked to design a tattoo by a friend. If it’s your design and work – all good, you don’t need to credit it on someone’s arm, both they and you know that it had been a design commissioned between you both, and the tattoo artist will respect that, and also lay claim to the work they did on your friend’s arm.
But as another example if you followed a lesson online and you then choose to get it printed and sell the cards for money, you would need to ask permission from the person who did the composition, it may be your pen work, but they gave you the design. If you say did a secondary design, perhaps taking the techniques that you learnt from your lesson and put them into your own design, you are all good. If you feel like being kind and put a photo up on social media, it’s always nice to tag someone to show you appreciate what they inspired you to do.
Likewise if you teach a technique you can attribute to someone, good idea to mention their name. Some techniques have been around the art world for years, but some person has come along put a tangle spin on them. And if course more than one individual can come up with an idea at a similar time, and each will have their own spin on the technique. Often if you reach out to a fellow tangler they are delighted it is getting used.
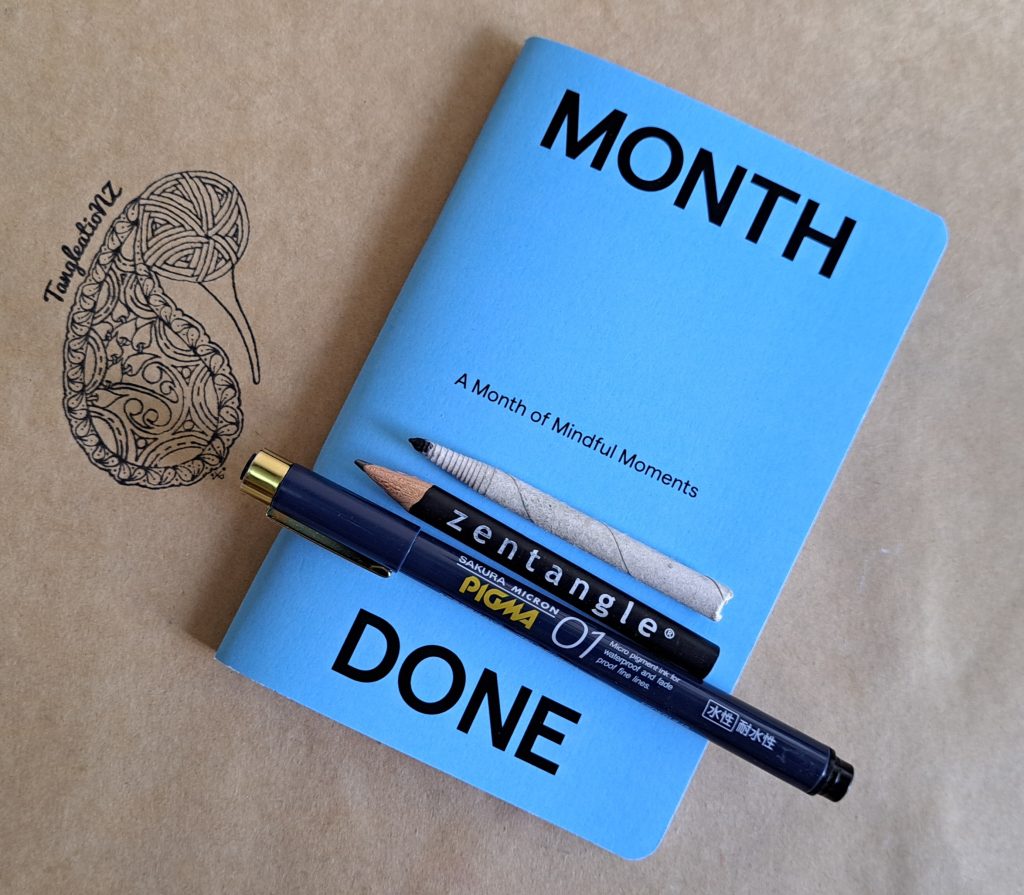
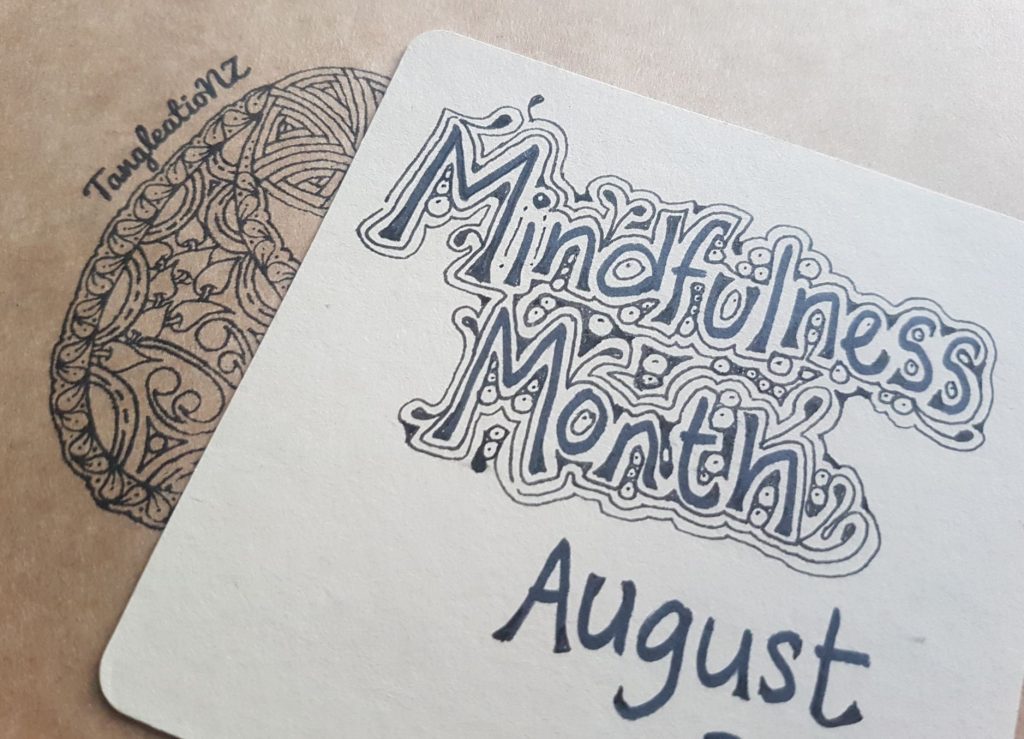
The second time round for my Mindfulness Month on YouTube – a free play list of monthly Prompts
The second time round for my Mindfulness Month on YouTube – a free play list of monthly prompts – a set of Mindful Month of tangling videos on my channel on YouTube, last year we did a small tile on each day, this time drawing directly into a Month Done journal, as we wander our way through a page a day this month.
You can buy a journal through my website here or direct from MonthDone – either way each booklet sends $10 to the New Zealand Mental Heath Foundation, it’s not too late to start, or if you have an existing journal in your art supplies stash, you can still join in – look out a journal which has at least 31 pages – they can be ‘one page’ each day rather than ‘one spread’. There are lots of little art journals on the market which you can use – or even make your own! Then relax and follow along every day this month to a series of tangles linked to each other, but each day unique. I have tried to keep them to less than 10 minutes long. This time we are following a path through the journal as we link the different tangles for the month.
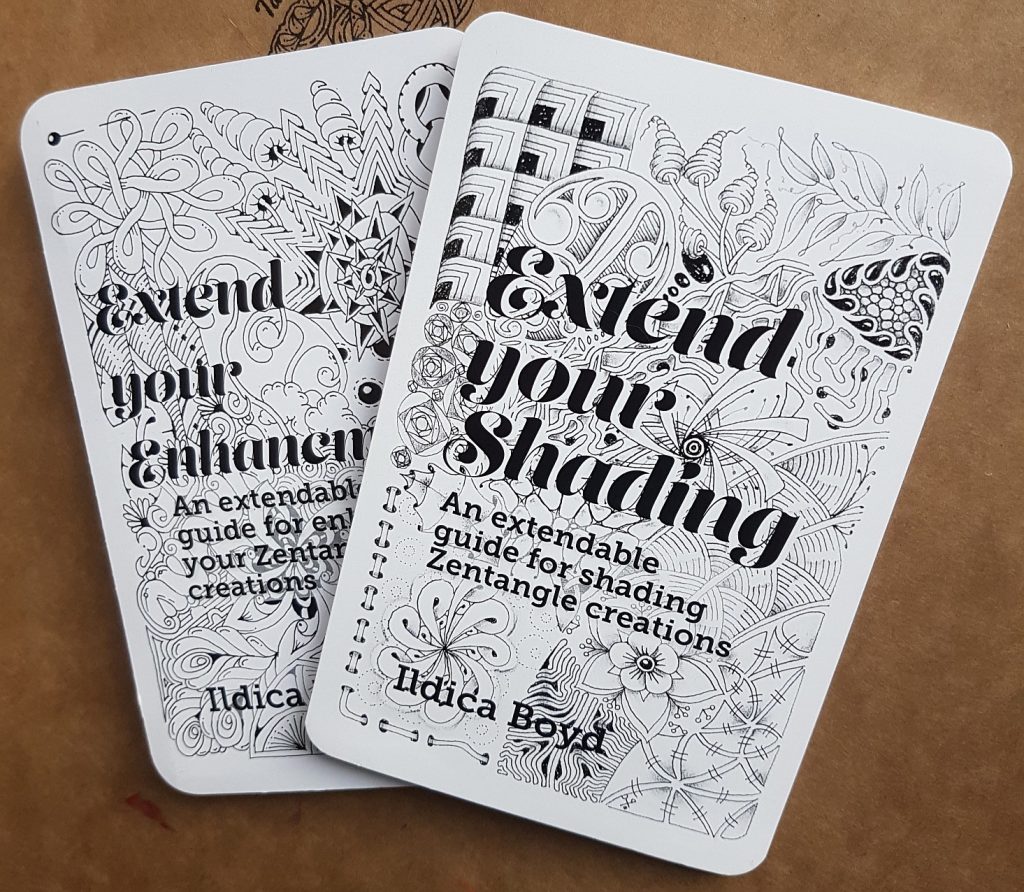
And finally it has arrived – my Extend your Enhancements! The sister guide to my handy shading guide, both now available to buy on my website, and they can be shipped all over the world*.
SO excited to bring this guide out, covering the traditional ones (Aura, Perfs, Sparkle, Rounding and Dew Drops) as well as ones influenced by other Tanglers creative ideas and new ‘what ifs’ I have come up with over the last 7 years. A collection of over 150 illustrations, suggestions, prompts and ideas to enhance your tangles, it’s a great pocket reference guide of ways to enhance your tangles. The original Shading guide has over 180 illustrations, suggestions, and motivations for shading – so the pair are jam packed with a very large amount of ideas!
* Note I can ship the Extendable guides anywhere are they travel as a letter. But also I now ship other products to Australia – and of course any downloadable lessons are available worldwide.
And to launch this guide, I have recorded a video lesson on just one of these enhancements the humble but very useful ‘Perfs’ – so if you are keen on following along creating your own beautiful reference tile of various perf enhancements, you can buy the “Performing Perfs” video lesson with its handout from my website.
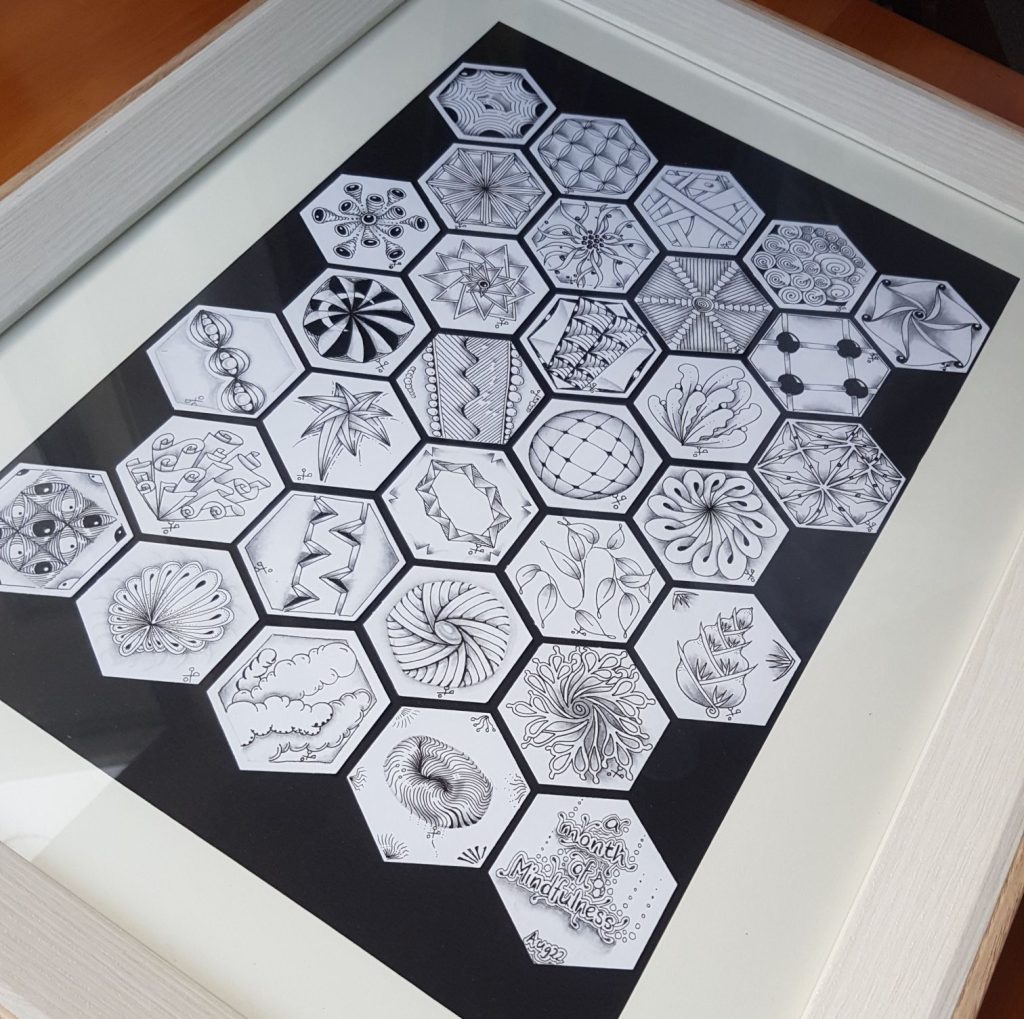
The Kindness Institute and the Mental Health Foundation of New Zealand, launched a mindfulness month for August in 2022 and as I use Zentangle in a mindfulness way, I wanted to share the practice with others, so I have chosen 31 different tangles which I feel work particularly well with keeping your attention to the task in hand. Keeping your focus on nothing else but where your pen is travelling now, and they are up on my youtube channel. They are about 10 to 15 minutes long and each one I hope gives you a collection of tangles, guided along to improve your focus, demonstrated in a mindfulness approach, I encourage you to do just one a day for a month and form a habit.
Clicking on the image below will take you to the introduction video.
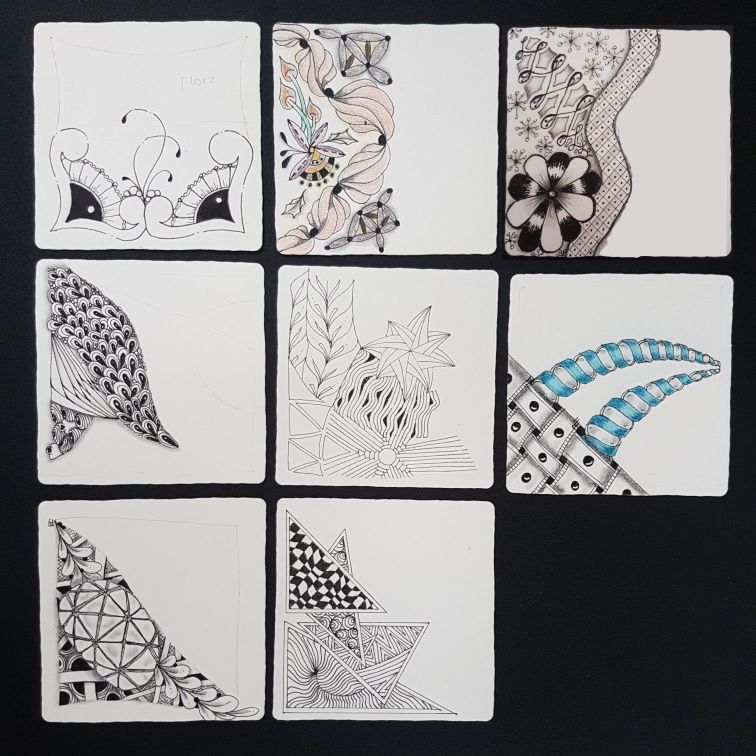
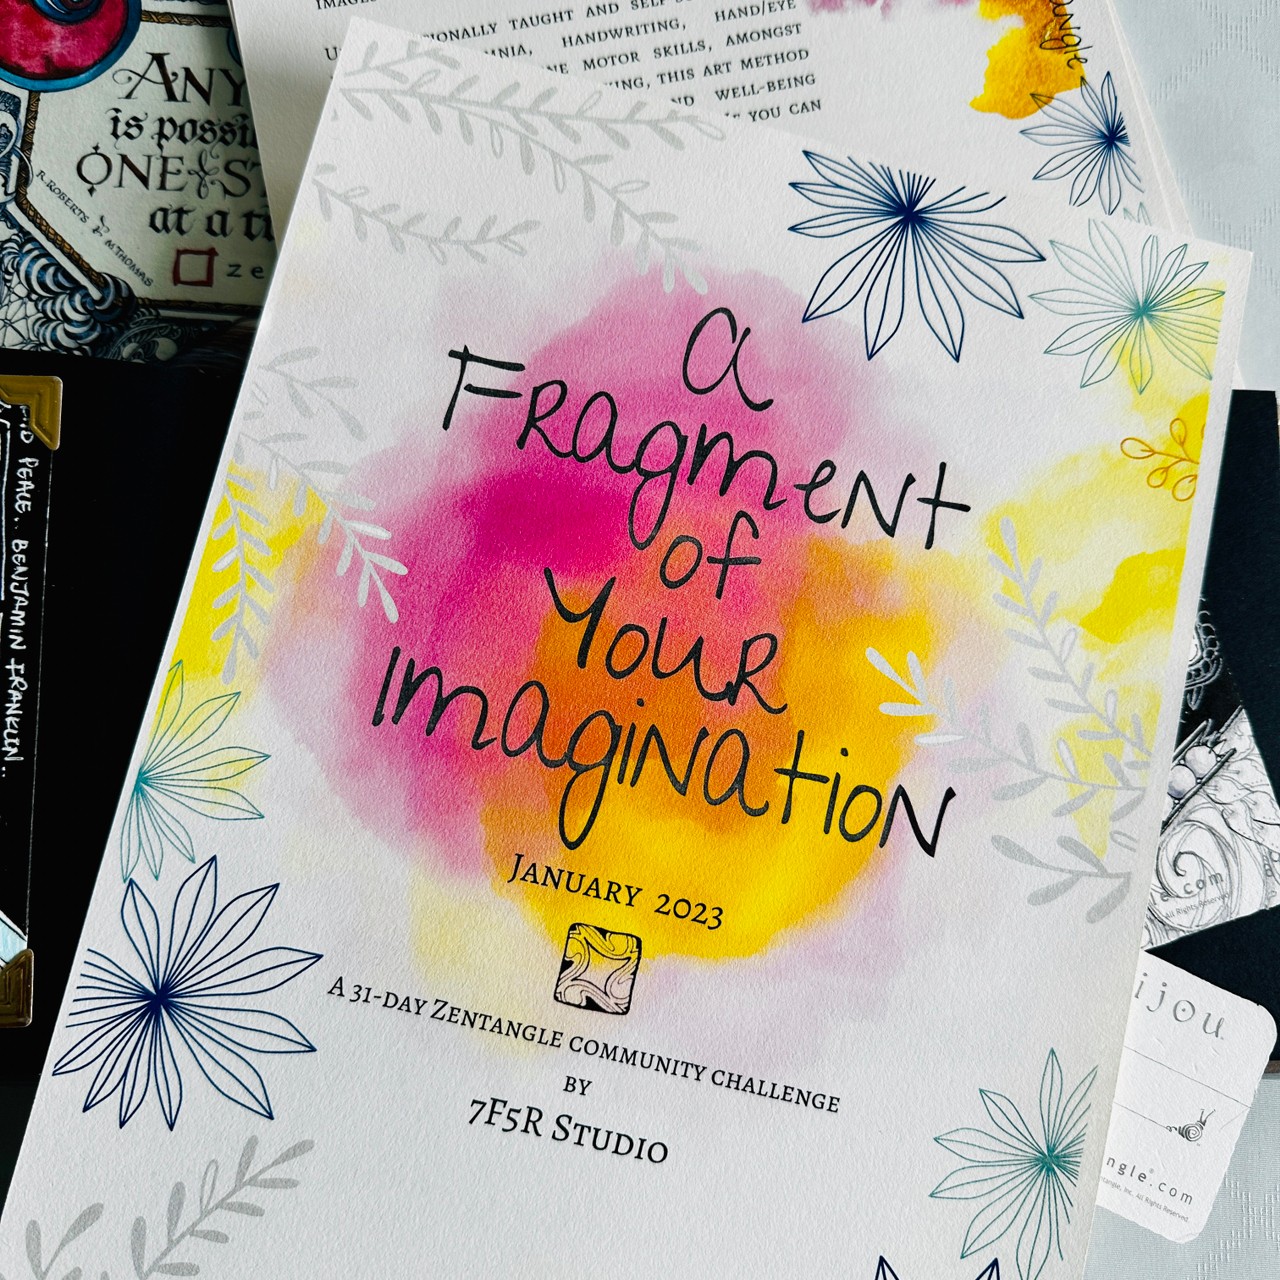
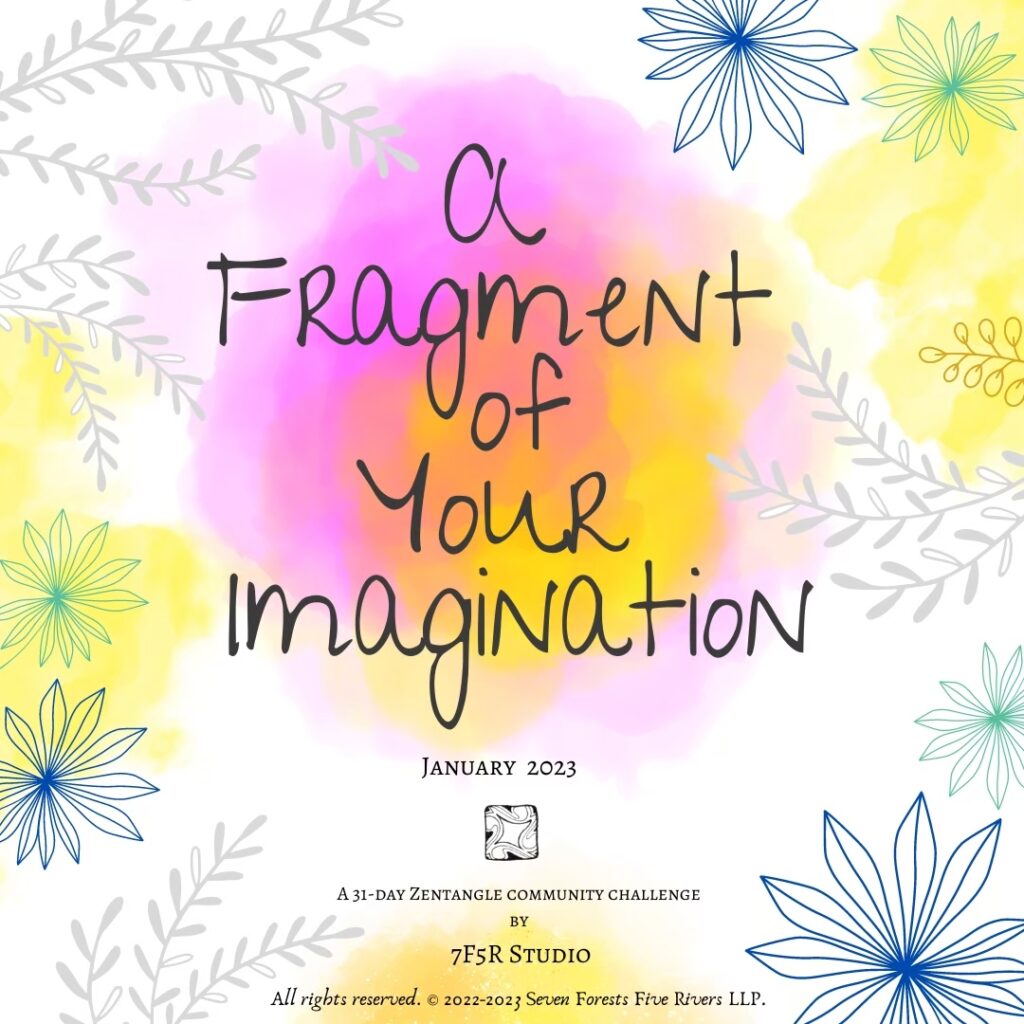
This year I teamed up with Debbie New, another CZT based in Singapore, to work on a monthly challenge based on drawing tiny fragments for the duration of January. This is a 31-day journey, created with four Fragment shapes – the Square, Round, Triangle and Seed. This prompt list will let you play with a collection of Fragments inspired by various tangles contributed from CZTs all over the world, and extra bonus Fragments to inspire you too.
A 21 page, full colour, printable PDF guide contains what you will need to join us. The prompts are listed with an visual example and sometimes links to a step-out to the original tangle that inspired it, or it lists the code from the Fragment pages of Zentangle® Primer book. There are also bonus Fragments and pages of suggested Strings and Reticula for you to use if you wish.
Click here to download the free, 21 page, full-colour, printable PDF.
You can join this challenge in so many different ways: Pick a large string and add to it every day; choose to draw a single tile using the daily fragment; add each fragment to a calendar entry; draw the prompts in sequence (or not); or swap one out to replace it with a fragment of your own imagination! Make this your challenge for the month with initial inspiration from us both! Free feel to tag your fragment artwork on social media with #FYIC2023 or #7F5RChallenge so that everyone can appreciate your art.
There are options of materials to work with on my website, my new Concertina Project Journals could well be an option! Make this your challenge for the month with initial inspiration from us both! Free feel to tag your fragment artwork on social media with #FYIC2023 or #7F5RChallenge
FAQs
Why is it called a “Challenge”? A Fragment of Your Imagination is where you are challenging yourself to draw a Fragment every day for a whole month.
What are the requirements to join A Fragment of Your Imagination Challenge? There are no requirements or rules. You can use any size of paper, type of pen or any other medium. You can tangle on a tile, in your sketchbook, and use any shape or size or colour. We have included suggested Reticulum and Strings to help you if you get stuck with ideas. You definitely do not need to be an artist or have any drawing experience.
When does A Fragment of Your Imagination Challenge begin? The Challenge begins on 1 January 2023 and ends on 31 January 2023.
What if I miss a day? There are no time limits with any of the 7F5R Challenges. You may combine various prompts into one larger art piece. Or you may even skip any prompts that do not appeal.
What if I don’t like a particular Fragment? Both Debbie and I would both encourage you to still try to create something with it. Pushing past your comfort zone and embracing new experiences – and having fun – are all a part of the spirit of all our tangle challenges. If you really dislike a Fragment and if it prevents you from enjoying yourself, by all means, please substitute it with other Fragments that you like. It is your art, after all, it should make you happy.
What happens after A Fragment of Your Imagination Challenge ends? Will there be another challenge in February? We do not currently have a daily challenge for the month of February. However, the 7F5R Challenge Facebook group CZT-admins host weekly, fortnightly and the Inktober Tangles Challenges in our Facebook group. 7F5R Challenge is also the official Facebook group for A Fragment of Your Imagination Challenge.
Is there an official hashtag for A Fragment of Your Imagination Challenge 2023? Yes. This year, we are using the hashtag: #FYIC2023
Thank you from Debbie and Ildica
As always, we both enjoy hearing from tanglers all over the world, and would happy to assist with any questions you might have, so feel free to write to Debbie at: debbie@7f5r.com or head to my own contact page or visit us on Instagram: Tangled.Pursuits and TangleatioNZ
If you appreciate our contributions to the tangling community, please consider supporting our work as a CZT via our gift donation sites: Debbie’s Ko-fi, or mine Buy-me-a-kiwi/tangleationz
In August 2022 I recorded a series of videos to celebrate ‘mindfulness month’ triggered by a project from The Kindness Institute and the Mental Health Foundation of New Zealand. There are now a series of 31 free videos on Youtube to give you quiet moments of thought, acceptance and tangling penmanship. I have shared some tangles that I find the most mindful to draw, or done in a mindful way.
They are small 10-ish minute videos, so you just need to grab something to draw on, along with your favourite tangling pen, pencil and blending tool to join in. You can start when suits you, but I hope the short snippets are easy to put into your everyday for a 31 day period, and make it easy to help you build up a habit. A (small) commitment to yourself and your mental health, each day.
Above is my final collection of Hexagon tiles, although I still have my MonthDone Journal containing all the other samples I showed in the videos. Clicking on the photo will take you to the introduction video. It is never too late, or a wrong time to start.